Showing posts with label Christmas. Show all posts

Friday, October 5, 2012

Cooking the Books - Southern Living's Cooking For Christmas

Okay, so this is last year's copy and I'm pretty sure they put this bad boy out yearly. But! There are some really awesome recipes in this particular edition.  I'm going to stray a little from my typical review format, since it goes without saying that Southern Living is going to put out a fantastic product.  Since Holiday meal planning can be a little... chaotic, I thought I'd highlight some recipes that are just plain fantastic. Allow me to direct your attention, if you will.

The Basics
Southern Living. Cooking for Christmas. New York: Oxmoor House, 2011. Print

What do you need to know? Southern Living + holidays + recipes = awesome. The end.

The (Cook)book
First, let me direct you to the eye candy that is the front section of this book, which focuses on table settings. Yes, I could look at this stuff for a ridiculously long period of time (seriously, don't take me anywhere near a home store). Even if you don't go all out, this section is great place to get some ideas and inspiration.

And don't pass up the menu section.  Do I follow the menus in books? Ever? No. But this section is a great place to start thinking about putting together your own menu. Plus, it's got recipes. (I'll admit, I mostly come for the recipes).

But let's get to the good stuff: recipes!  This book is stuffed with them, but let me highlight a few of my favorites. (I've tried all of these, so I already know they're tasty and delicious).

Cherry Pecan Brie: This recipe is great. If you get the ingredients together in advance you can churn this sucker out in no time. Mix, pour, serve. And, voila! You've got an elegant appetizer to serve your holiday guests. It looks and tastes wonderful, and no one will guess how little effort it took. And believe me, if you're prepping a huge Christmas (or holiday) Feast, having a few simple dishes on the menu will save you a lot of stress (and sanity; sanity is good). See page 47.

Two-Cheese-and-Honey Fondue: Can you say "nom"? Admittedly, that probably has a lot to due with the heavy cream and the cheese. (Cheeeeeeeese). See page 71.

Grandma Erma's Spirited Cranberry Sauce: Sound familiar? That's because this recipe turned out to be so wonderfully tasty that I had to share it with y'all. It's one of the few test recipes I've done from a cookbook on this blog. I can tell you that I will never serve another cranberry sauce other than this ever again. (You think I exaggerate, but this was my favorite part of last years holidays). And heaven help you if you've been eating the stuff from the can. Stop it. Now. And make this! See page 173.

Recipes I haven't tried but plan to because they look freaking delicious:

Chocolate Truffle Cheesecake - the name really says it all on this one, and if you look at the picture that snowflake is way too pretty. (likelihood that I can pull this off: excellent for the cheesecake, slim to none for the snowflake. Curses!). See page 50.

Classic Bake Macaroni and Cheese - sadly, I'm still searching for the perfect Mac'n'cheese recipe. Martha failed me last year, so perhaps I'll go for this on holiday season. If nothing else the sheer amount of butter, cheese and milk should make several family members squirm nicely as they calculate fat content. Heh heh heh. See page 191.

The entire section on breads - What can I say? I like carbs. See pages 201-211.

I hope you pick up the book and give some of these a whirl. There's plenty of recipe to choose from. Needless to say, I'll be first in line for this year's copy. And before you go, let me direct you to one last recipe not in the book: Southern Living's Pumpkin-Pecan Cheesecake. I made this bad boy last Thanksgiving. Perfection.


Sunday, July 22, 2012

Super Easy Sunday: Christmas in July Chai Milkshakes

Mmmmmmmm. I'm drinking my milkshake now and relishing the fact that it took all of 5 minutes to make.

What You'll Need
Supplies
Blender
Spoon
Measuring cup
Two glasses
Ingredients
3 cups vanilla frozen yogurt
1 1/2 cups milk
2 scoops Trader Joe's Spicy Chai Latte Mix

Now Let's Make Christmas in July Chai Milkshakes
Now, I know I don't usually call out brand names here on The Book Pantry, but trust me, the Trader Joe's is perfect. If you can't find it, use something comparable.

Using the markings on your blender (or, you know, a measuring cup), measure out 3 cups of vanilla frozen yogurt. Pack it down into the blender to make sure you're getting 3 whole cups.  You can also use vanilla ice cream, but you really won't notice a difference once it's all blended, so why not be healthy?


Next, measure out 1 1/2 cups milk (again, I used nonfat). Pour into blender. This makes a pretty liquidy, drinkable milkshake. If you prefer yours a little thicker, I recommend using only 1 cup milk.


Using the scoop that comes with your Trader Joe's Spicy Chai Latte Mix, add two scoops of the mix to the blender. 


Put the top on (please, God, put the top on!) and blend until all the ingredients are mixed and it looks like a milkshake.  


Serve in two tall glasses and enjoy the taste of Christmas!

This photo needs fancy-pants straws.


Sunday, June 24, 2012

Back By Popular Demand - The Oatmeal Raisin Cookie

Okay, so I technically I've done this recipe before, last Christmas. But I've had several people inquire about my Oatmeal Raisin cookies of late, and I thought I'd do an updated version. So, it now features new and improved instructions and, of course, lots of deliciousness. This recipe started as a rather basic one I found in some old recipes of my grandmother's that I tweaked a bit until it was just right.

What You'll Need
Supplies
Large mixing bowl                                                     Cookie sheets
Wooden mixing spoon                                                2 Table spoons
Measuring cups                                                          Spatula
Measuring spoons                                                      Wire Rack or paper towels
Cooking Spray
Ingredients
2 sticks butter                                                            1 tsp cinnamon
1/2 cup sugar                                                            1/2 tsp salt
2 large eggs                                                               1/2 tsp nutmeg
2 tsp vanilla extract                                                  1 cup light brown sugar
1 1/2 cups flour                                                         3 cups old-fashioned oats
1 tsp baking soda                                                      1 cup raisins

Now Let's Make Oatmeal Raisin Cookies!
Preheat your oven to 350F.

Place your 2 sticks of butter in the large mixing bowl.  If the butter is not already soft, microwave for a few seconds until it has softened but not melted.  It's very important that you don't allow the butter to melt, as this will ruin the consistency of the cookies. Add 1/2 cup of sugar to the softened butter. Only add the white sugar, not the brown; this is important for the texture of the cookie. (Stop looking at me like that; it is!). Beat the sugar and butter together until butter is creamed.

Mmmmm..... Buttah!

Add the 2 large eggs and 2 tsp of vanilla extract to the mixture.  Use real vanilla extract; the fake stuff just isn't right (yes, I know it cost more; stop whining and add! *cracks whip*). Stir the eggs and vanilla in until the mixture is fairly even.  Try to use room temperature eggs.  The colder the eggs are the more likely it is that your butter will start to clump up, creating a slightly lumpy mixture.  If this happens, stir the mixture until the clumps are as small as possible (you may have to break out the whisk).  It's not a really big deal, but it will help you mix the other ingredients in more thoroughly later.

Don't those eggs really make you want to click and pull up the slideshow?

Measure out 1 1/2 cups of flour and add it to the mixing bowl.  Add 1 tsp of baking soda, 1 tsp of cinnamon, 1/2 tsp of salt, and 1/2 tsp of nutmeg to the mixing bowl. Then, measure out 1 cup of light brown sugar, tightly packing the sugar into the measuring cup as much as possible.  When you have a full cup of tightly packed brown sugar, add it to the mixing bowl. (You're welcome to use dark brown sugar, but it changes the consistency and flavor a bit, so you might have to play with it to get it right).  Mix all the ingredients together, making sure everything is evenly distributed and there are no dry patches or liquidy spots. It a fairly dry dough, so it'll take a bit of stirring (and muscle) before you get it all mixed.


Now, add 3 cups of old-fashioned oats to the mixing bowl. It's important that you use old-fashioned only, as the quick oats or instant oatmeal varieties are just not the same and will mess the recipe up. (You whippersnappers and all this new-fangled nonsense *shakes cane*). Measure out 1 cup of raisins, packing as many into the measuring cup as possible and add them to the mixing bowl.  The fresher the raisins are, the more their flavor will pervade the cookies, and the tastier the cookies will be.  Mix in the oatmeal and raisins until they are evenly spread throughout the batter.


Spray your cookie sheet lightly with cooking spray to ensure the cookies won't stick (unless you're using a no-stick pan, in which case leave it alone).  Take your two regular table spoons; use one to get a heaping spoonful of dough and use the back of the other spoon to scrape the dough onto your cookie sheet. I prefer these cookies to be pretty big, which allows them to remain soft and chewy.  These cookies will definitely spread, so I typically do about 12 per sheet.

Spaced 3 x4 along the pan, with at least an inch between

Bake at 350F for 12-13 minutes.  I always bake one sheet at a time to ensure even cooking and prevent burning. Allow the cookies to sit for a minute or two before removing them from the cookie sheet; this will prevent them from crumbling since they're very soft. Use your spatula to remove the cookies and set them on a cooling rack (paper towels on the counter will do) to cool completely.


Voila! I now have a belated plate of Father's Day Oatmeal cookies for my Da (who's been away on his honeymoon for the actual day). The recipe makes around 3 dozen cookies, depending on size. Store in an airtight container to ensure freshness and preserve the cookies' chewy goodness.  Or, serve with a big glass of milk and nom!


Sunday, January 15, 2012

Sweet Sweet Potatoes

There just aren't any good cheesy titles for this. Time for another easy side dish (yes, I'm still riding on the coattails of the holiday dinner; last time, swear!).  This one happens to be my favorite, and being the wierdo that I am, I mix it with practically everything at the holiday meal.  You guessed it: Sweet Potato Casserole! (What's that? You didn't guess?) This recipe takes a sweet potato and turns it into a delicious (read, unhealthy) bit of decadence.  But seriously, despite all that butter and sugar, a serving of this goes a long way; once that casserole is divided 20 ways the impact is slight. As for the origins of this recipe, it's all mine; I made it up by experimenting and adding the basics until I was pleased with the results (the most fun kind of cooking).

What You'll Need
Supplies
Dining plate                                                                Mixing spoon
Dining fork                                                                  Measuring cups
Knife for chopping                                                       Measuring spoons
Cutting board                                                              13 x 9" casserole dish
Large mixing bowl
Ingredients
7 sweet potatoes                                                          2 tsp vanilla
1 3/4 cup brown sugar                                               1 cup pecans
1 cup nonfat milk                                                         Mini-marshmallows
1 cup butter 

Now Let's Make Sweet Potato Casserole!
As usual, begin with your prep work.  Preheat the oven to 350F. Using your knife and cutting board, chop up enough pecans to measure out about 1 cup. Since this is for the topping, and it's a relatively rustic dish, there's no need to be super precise here; if you're over or under it won't matter. 

This recipe calls for violence
On to the sweet potatoes!  I try to pick potatoes that are medium-largish.  You don't want really small ones as there won't be enough potato, but you don't want huge ones that take forever to cook, either. Begin by giving the potatoes a decent rinse. We won't be using the skins, so they don't have to sparkle, but excess dirt can transfer from your hands to the inside as you handle the potato (Blegh!). Use your fork to stab each side of the potato to help release air (Apparently, potatoes can explode if you skip this step, but I've never tested that. Really). Try not to look too demented as your stabbing the potatoes.  Place 2-3 potatoes on your dinner plate and microwave for 8 minutes. Poke with the fork to see if they're done; there should be no hard places.  Repeat until all the potatoes are cooked (I do this as I do the skinning step below).

Peeling (probably cursing)
As your other potatoes cook, begin skinning the potatoes that just finished.  Slice the potatoes in half and let them sit for a couple minutes to cool a bit (Not waiting = curses and burnt fingers).  When ready, begin removing the outer skin from the potatoes.  You can do this any way that works for you.  I tend to squeeze the potato a bit and the peel with my fingers and occasionally a knife for stubborn pieces. Place the sweet potatoes in your large mixing bowl as you go and set the skins aside for composting (or weird dogs that like potato skins, as mine do). Repeat for all the potatoes.

When all of your potatoes are in your mixing bowl, take the fork and mash them up really good.  Make sure not to leave behind any large lumps as this will affect the texture of your casserole. Once mashed, we can begin adding the other ingredients. Measure out 1 3/4 cup of brown sugar, packing it into the measuring cup as you do so; dump this into the mixing bowl. Then measure 1 cup nonfat milk and pour it into the mixing bowl. Microwave the 1 cup (2 sticks) of butter until it has begun to melt and pour this into the mixing bowl.  Measure out 2 tsp of vanilla extract and add to the sweet potato concoction (thought I was going to say mixing bowl, didn't you?).  Using your mixing spoon, blend all the ingredients together until everything is well mixed.  You shouldn't be able to distinguish any one ingredient except for the sweet potatoes by the time you're done.


Spoon the sweet potato mixture into the 13 x 9 inch casserole dish, spreading it out evenly.  Sprinkle your chopped pecans over the top of the casserole until you have an even layer. Do the same with the mini-marshmallows.  I typically use about 4 handfuls of marshmallows, but you're welcome to add as many or as few as you'd like. 

The finished product. Note the marshmallow's color.
Bake the casserole at 350F for about 30-45 minutes.  Cooking time varies drastically depending on the oven and the position of the casserole inside the oven. Just watch the casserole as you cook and remove it when the marshmallows have browned. Do NOT overcook; marshmallows are flammable (thankfully not something I learned from experience)! Serve casserole as a side dish to accompany you're favorite meal.  I find that it goes well with both pork and poultry. 


Sunday, January 8, 2012

Corny and Delicious

Prepare yourself for what is quite possibly one of my most addictive recipes.  When I threatened to exclude it from the holiday menu this year, I was met with quivering lips and watery eyes all around.  Corn Pudding is almost a cross between cornbread and spoon bread (in fact, my recipe is close to my Grandma Kay's spoon bread recipe). This dish is a pudding in the more traditional British sense of the word which comprehends savory flavors (sorry, I've been reading Austen) as well as Jello-like sweetness. And to top it off, it's ridiculously easy for something that tastes so yummy.

What You'll Need
Supplies
Large mixing bowl                                                       13 x 9" casserole dish
Stand mixer
Ingredients
1 stick butter                                                                1 can creamed corn (15 oz)
2 large eggs                                                                  8 oz sour cream
1 can whole kernel corn (15 oz)                                  1 box corn muffin mix (7.5 oz)

Now Let's Make Corn Pudding!
Mmmm. Butter.
Begin by preheating your oven to 350F.  Then, melt your stick of butter in your large bowl.  It doesn't need to be entirely melted, but it won't matter if it is.  Just don't overcook it so much that some of the butter evaporates. 30-40 seconds should do it.

Once you've mostly melted the butter, add two large eggs.  Also add both cans of corn, without draining off any liquid.  (seriously, don't drain; it's really hard to adjust with the right amount of water if you mess this up).

Mix, mix.
Now add 8 oz of sour cream to the bowl. I typically prefer to use Daisy Light sour cream as it cuts the calories of the recipe without sacrificing flavor. (You can also leave off the butter if you really want to, but it affects flavor and fluffiness. Still tasty, but not the same. I discovered this accidentally. Heh heh). Lastly, pour in your box of corn muffin mix.  I typically use Jiffy, but I'm sure it'd work with another brand just fine.

Yay, pudding!
Turn your mixer on to a medium low speed, and mix the ingredients until they are thoroughly blended. It is especially important that the eggs and sour cream get fully mixed in, as they tend to be stubborn.  If you need to break things down further with a whisk, don't be afraid to. (Not mixing properly results in a lumpy pudding, and that's just wrong).

Pour the pudding batter into the 13 x 9 inch casserole dish.  Shake the dish slightly from side to side to get the batter to settle evenly into the dish. 

Bake at 350F for about 40-45 minutes, until the top of the pudding is a golden brown and lightly crusty.

This recipe doubles easily, which is what I typically do for holidays since the dish is so popular.  If you choose to double the recipe, use a 15 x 10" dish and cook for 1 hour to account for the extra volume.  This dish goes with pretty much anything, but pairs especially well with ham or a hearty meat chili.


Sunday, January 1, 2012

A Red Velvet Holiday

Happy New Year from The Book Pantry! This Christmas dinner, I served a Red Velvet Cake for dessert.  Red Velvet Cake is a southern tradition, although it seems pretty popular elsewhere, too. (And, really, what's not to like?). Mine is loosely based off a recipe for the cake in The Boozy Baker cookbook, to which I've made a few alterations of my own (mainly the type of alcohol and the amount of food coloring). The cream cheese icing recipe is my own, but there's only so many ways to make cream cheese icing, just saying.  This is a delicious and pretty cake sure to impress anyone you happen to serve it to.  Despite my usual low-tech approach to baking (enforced only because I lack toys), this recipe needs a mixer. You cannot mix the cake batter by hand and not over mix, thereby creating a tough cake.

What You'll Need
Supplies
2 nine inch cake pans                                          Measuring cups
Large mixing bowl                                              Measuring spoons
Medium mixing bowl                                           Mixing spoon
Small mixing bowl                                               Long serrated bread knife
Stand mixer                                                         Icing knife/spatula
Whisk                                                                  Cutting board
Cooking spray                                                      Chopping knife
Ingredients for Cake
3 cups cake flour                                                  1 tsp vanilla extract, running over
5 Tbsp cocoa powder                                           1 tsp white vinegar
1 1/2 tsp baking soda                                          3 oz red food coloring
1/2 tsp salt                                                           1 1/2 sticks unsalted butter, softened
3/4 cup buttermilk                                                2 cups sugar
1/4 cup rum                                                          3 eggs
Ingredients for Frosting
16 oz cream cheese, softened                               2 cups confectioner's sugar
2 sticks butter, softened                                       4 Tbsp vanilla
3 cups pecans

Now Let's Make Red Velvet Cake!
Preheat the oven to 350F.  Time for prep work: Remove your 16 oz of cream cheese and 2 sticks of butter from the refrigerator and set aside to soften until you're ready to do the icing. Also remove your 3 eggs so that they come close to room temperature by the time you need them.  Now, coarsely chop enough pecans to equal 3 cups: that's about 4 handfuls.

Spray your two cake pans with cooking spray.  Pour out a small pile of flour into each pan (click to enlarge photos for an example). Dust the pans with the flour by holding the pan up and tilted and tapping the bottom, rotating the pan as you go to allow a thorough coating.  Once the bottom of the pan is coated, continue this process with the remaining flour around the sides of the pan.  I recommend doing this over the kitchen sink, as it can get a little messy.  Set your coated pans aside.


Cocoa Powder! *shakes fist*
In your medium mixing bowl, measure out 3 cups cake flour, 5 Tbsp cocoa powder, 1 1/2 tsp baking soda, and 1/2 tsp salt.  Whisk the ingredients together until they are evenly distributed and there are no large cocoa powder lumps (cocoa powder is sneaky and devious; be thorough in your eradication). Set the dry ingredients aside. 

In your small mixing bowl, measure out 3/4 cup buttermilk (not that non-fat gunk, either; that defeats the purpose of buttermilk), 1/4 cup of rum, 1 tsp vanilla extract (allowing the vanilla to run over into the bowl slightly as you measure), 1 tsp of white vinegar, and 3 oz of red food coloring. Whisk the ingredients together until you have a (very red) smooth liquid mixture.  For a brighter cake add food more food coloring, but be aware that it affects flavor a little.  If you'd like to avoid food coloring altogether, puree 1-2 cooked beets. Keep in mind that the interaction between the buttermilk and the cocoa should achieve a slight red color as it is (woot! Chemistry!). Set the liquid mixture aside.

No shells in this cake!
Place 1 1/2 sticks of butter in your large mixing bowl.  Soften in the microwave if necessary, being careful not to fully melt the butter.  Using your mixer at a low speed (about 2 on mine), beat the 2 cups of sugar into the butter until fluffy. Then, add the eggs one at a time, beating after each addition. I recommend stopping the mixer for each egg addition, so that you can fish out any stray pieces of eggshell that might make their way into the batter. (Remember, an easy way to remove pesky shells is to wet your finger before trying).

Set your mixer to medium-low speed (about 4 on mine, but don't turn it on yet).  For this step you are going to gradually add the flour mixture and the buttermilk mixture, alternating between the two.  You want to do this is partial amounts; I typically wind up with four additions of each.  Start with the flour mixture and end with the buttermilk mixture to achieve the appropriate consistency for your batter. Be careful not to go too slowly and over mix your batter.  Over worked batter will result in a tough, chewy cake. (Blegh!)


Divide the cake batter between your two cake pans, scraping the bowl to get all the good bits. Lightly shake your pans from side to side to settle the batter evenly into the pans.  Bake at 350F for about 40 minutes.  Test the doneness of the cakes by inserting a toothpick (or fork prongs) into the center of the cake. Cakes are done when toothpick comes out clean.  Set cakes aside to cool.

Yes, it's upside down.
Once cakes are mostly cool, remove one cake from pan and place it on your icing station (work area, display, wherever you're planning to ice the cake).  Take your long serrated knife and evenly slice off the curved top of the cake, so that you'll have a flat bottom layer.  Offer the cake top to any circling family members that happen to be around. (Vultures!) Loosen the other cake in the pan, but leave in pan until cakes are completely cool.

Mmmmm... frosting.
While cakes are cooling the rest of the way. Wash out your large mixing bowl, so that you can begin whipping up the frosting.  Place your 16 oz of cream cheese, 2 sticks of butter, 2 cups of confectioner's sugar and 4 Tbsp of vanilla in the (now clean) bowl.  Stir the ingredients together with your mixing spoon until you have a thoroughly blended, smooth frosting. You can flavor the frosting with anything you'd like, simply replace the vanilla with your choice of flavor (lemon juice, more rum, orange liqueur, etc).

Spread some frosting on top of the already stationed cake.  (Do not do this if cake is not yet cool, or you'll have a melty, blobby cake and who wants that?). Smooth the frosting across the surface of the cake until you have a decent layer of frosting.  Remove the other cake layer from its pan and carefully place it centered over the bottom layer.  You can cut the top off this one, too, if you want a flat topped cake, but I never bother. Gently spread frosting over the entire cake, beginning with the top before moving on to the sides.  Try to avoid any bare or translucent spots where the cake shows through.  Once all the frosting is on the cake, smooth it out to make it purty.

Yum!
Now, take your chopped pecans and begin coating your cake.  Start with the top center and work your way outward.  You want some white to show through but don't want any bald spots, so try to be even handed.  "How do you coat the sides?" you ask. I grab a small handful of chopped pecans, get close to the cake and toss/press the nuts into the cake.  This is really messy, so have a broom handy (or a pecan loving dog, either will do).  
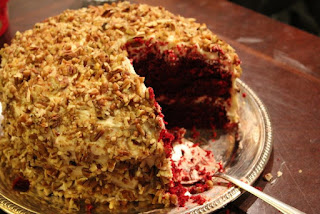
Isn't it pretty?!
Now, stand back and admire your handy work!  This cake goes really well with postprandial coffee.

Big thanks to my future step-brother, Stevie, for letting me use his Nikon and helping with the pictures. I'm actually in one! Le gasp.  Also, thank you to my lovely friend Jen for doing the second stage icing, thus preventing me from my annual apoplectic frosting rage.  


    Pin It

Thursday, December 15, 2011

Classy Classics

In today's post, I'm doing something a little different than my usual book review.  Today, I'm posting on a book that's considered a classic. Naturally, such a title hardly requires a review; if it did it wouldn't be considered a classic in the first place (like, duh).  This classics post focuses on Louisa May Alcott's Little Women, which was one of my favorite books as a teen and remains so today.  I also associate the book with the holiday season, perhaps because the book begins at this time of year.  Regardless, this is my happy feels book I read almost annually (I really need to break down and buy a nice hardcopy; I've been through 3 paperbacks by now).

The Basics
Alcott, Louisa May. Little Women. New York: Signet Classic, 2004. Print.

Little Women follows the lives of the four March sisters: Meg, Jo, Beth, and Amy. The  girls are 16, 15, 13, and 12 respectively when the book opens, and readers shadow the girls through their teen years as they become young women.  Much of the story is based on Alcott's real life experiences with her own sisters, so it makes sense that the books seem to focus largely on Jo March (the character most closely resembling Alcott). However, the novel does often divert from Jo in order to tell the stories of the other sisters to the fullest.  The book is a heartwarmingly wholesome story for young girls that pulls readers delightfully into the 1860s American household in Concord, Massachusetts. 

Why You Should Read this Book (and/or force it on the nearest young adult)
One of the best features of the novel is its focus on overcoming struggles that life presents and bettering yourself along the way.  Though by no means poverty stricken, the March family has fallen on harder economic times after one of their father's investments goes south.  This puts the girls in the odd position of being in an upper class family without the means to reflect that status. They also face the hardship of being without their father, who has joined the Union army as a chaplain. This leaves the girls, along with the stalwart Ms. March, to run the household themselves. The March girls face these challenges as well as the challenges of their own individual personality flaws as they work to become the best "little women" possible (as patronizing as that phrase can sound, I think this novel means it more as the start to womanhood than anything else).  The books is full of little successes and joys as well as hard times and tragedies, making it a well-rounded, engagingly realistic read.

Little Women is almost entirely character driven. While it has little plot points that occur throughout the novel and a few larger (if more subtle) ones that unite the story as a whole, Little Women is primarily centered on the everyday lives of its heroines.  Meg, the eldest, is a sweet tempered, beautiful girl on the cusp of womanhood. Meg most remembers the March family's former wealth, and her desire to return to that former status combined with her vanity is her biggest struggle.  She must resist the trappings of a wealthy life that would only make her materially happy.  Jo is tomboyish and a little wild with aspirations to become a great writer and avoid becoming a young lady as long as possible. Over the course of the novel Jo works to overcome her more imprudent spontaneity and her hot temper.  Beth is the sweetest, kindest of the March girls, but she is also painfully shy and fearful of strangers.  Her challenge in life is to overcome her shyness enough to make friends and accept kind overtures.  She also faces her own sickly constitution, which she handles with a grace and infinite patience that inspires her sisters to better themselves.  Amy is slightly spoiled, very vain and proud, and somewhat inclined toward selfishness; however, she also has a sweet an loving nature. The first half of the novel sees Amy work to overcome the selfish parts of her nature and begin thinking more of others than of herself.  In the latter half, Amy gradually turns her vanity and pride into being a proper young lady. It's nearly impossible not to like and identify with Alcott's characters.

I also really enjoy the sense of the period that the book provides.  Readers are exposed to a charming  19th century New England that nevertheless maintains a sense of realism.  Through the girls, readers are exposed to ideas of dress, propriety, class and religion common to the era.  You also get a strong sense of womanhood in the period (albeit a specific class level), as well as common activities, socializing and the important role marriage played in a young girl's life.  Along with your enjoyable read, you also get a small slice of history if you're clever enough to notice it.

Extras


Sunday, December 11, 2011

Like Buttah

Tonight marks the beginning of my annual Baking Extravaganza.  I'll be sharing the recipes (if not the calories) of this esteemed event here on The Book Pantry.  This evening brings us the Butterball.  This cookie is my Da's favorite (I've only been taunting him about it all week), and I inherited the recipe from his mother.  Since I never got the chance to know my paternal grandmother, I didn't actually learn this one from her.  Instead, I spent several Christmases recreating the cookie from her original, basic recipe (like many cooks, her practice varied from its record).  The result is a tasty, not-too-sweet, slightly crumbly cookie. Best of all, (despite how long it took me to tweak it to perfection) the recipe is probably the easiest of Christmas cookies.

What You'll Need
Supplies
Large mixing bowl                                                     Cutting Board
Wooden mixing spoon (well-loved)                              Cookie sheet
Measuring cups and spoons                                        Small bowl
Knife for chopping
Ingredients
1/2 lb butter, very soft                                                1 cup chopped pecans or walnuts
1/2 cup powdered sugar + some for rolling               1/2 tsp vanilla
2 cups all-purpose flour                                               Salt

Now Let's Make Butterballs!
Start (as usual) by preheating your oven to 350F (yes, I forgot. Again.). Plop a 1/2 pound of butter - also known as 2 sticks - into your large mixing bowl.  If your butter is not already soft from being left out, pop it in the microwave for about 20-25 seconds. Watch it carefully!  You do not want to actually melt the butter; we just want it very soft.  If you melt your butter, the recipe will turn wrong . . . very wrong. (Do I hear gasps of horror? Did you melt your butter? You did, didn't you? Don't worry a tiny amount of melt won't hurt). Anyway, soften your butter.  Then, beat the butter with your mixing spoon until it is creamed.


Chop, chop.
On your cutting board, chop your pecans using your knife in a lever motion, moving across the pile of pecans. Stop occasionally to scoop your pecans back into a pile and repeat until all the pecans are chopped finely. Keep chopping pecans until you've filled a 1 cup measuring cup.  I find that two really big handfuls of pecan halves tend to equal out to 1 cup of chopped nuts. (Yay for measuring: like science, but tastier!)

Confusing amount of salt
Add your pecans to the bowl of butter.  Measure out 1/2 cup of powdered sugar, packing it into the measuring cup as you do so (like you would for brown sugar). Add this to the bowl.  Now, measure out 2 cups of all-purpose flour, making sure to level each cup off before adding it to the bowl. (Freak out when you can't find the flour, curse your cousin for using it all in chocolate-chip cookies at Thanksgiving, make boyfriend put on shoes, *oh wait, I found it! heh heh*). Then, add 1/2 teaspoon of vanilla; measure it over the bowl so that you can allow it to run over a bit as you measure.  Lastly, add enough salt to mostly fill the dip in the palm of your hand when your hand is cupped.  Confusing?  See the picture (click to enlarge).

While safe to eat, this raw dough
tastes not so nice.
Mix all the ingredients together in the bowl.  The batter will be very dry, so it takes some time to get everything mixed thoroughly.  Take your time and patiently mix.  If you wind up with parts of the dough that are softer and more buttery than others, those buttery cookies won't hold their shape! 

Once the dough is sufficiently mixed, begin rolling the dough into balls that are about 1 inch in diameter.  To do so, take a pinch of dough and either form it into a ball-shape with your fingers or roll it between the palms of your hands. If your dough is crumbling and refusing to take shape, squeeze it together in your fist; this will mush the ingredients more and allow you to make a ball.  Place each ball on your cookie sheet.  They shouldn't increase in size much during the cooking process, so you can space them pretty close together, about 1/2 an inch.

Bake the cookies at 350F for about 15 minutes until the bottoms begin to tun a golden brown.  You'll have to watch the very edges of the cookies for signs of this browning. Remove the cookies from oven and begin moving them from the cookie sheet to a cooling rack (also known as paper towels on the counter in my house). You'll know pretty quickly if you didn't mix your butter in thoroughly enough as those cookies will have spread out more, perhaps even running together, as in the second picture here.  Don't worry too much if your Butterballs aren't actually ball shaped anymore, though; they'll be more like mounds than balls.


No deep breaths!
Allow the Butterballs to mostly cool.  Pour some extra powdered sugar into your small bowl. While the cookies are still slightly warm, begin rolling them in the sugar until they are lightly coated (so that little bit of emphasis applies mostly to me). Don't try to roll the balls while they're very warm still or your powered sugar will become gunky, which is gross.

Store in an airtight container.  Or, better yet, serve with a nice glass of milk! Enjoy!
Yay, cookies!