Showing posts with label feast. Show all posts

Sunday, January 8, 2012

Corny and Delicious

Prepare yourself for what is quite possibly one of my most addictive recipes.  When I threatened to exclude it from the holiday menu this year, I was met with quivering lips and watery eyes all around.  Corn Pudding is almost a cross between cornbread and spoon bread (in fact, my recipe is close to my Grandma Kay's spoon bread recipe). This dish is a pudding in the more traditional British sense of the word which comprehends savory flavors (sorry, I've been reading Austen) as well as Jello-like sweetness. And to top it off, it's ridiculously easy for something that tastes so yummy.

What You'll Need
Supplies
Large mixing bowl                                                       13 x 9" casserole dish
Stand mixer
Ingredients
1 stick butter                                                                1 can creamed corn (15 oz)
2 large eggs                                                                  8 oz sour cream
1 can whole kernel corn (15 oz)                                  1 box corn muffin mix (7.5 oz)

Now Let's Make Corn Pudding!
Mmmm. Butter.
Begin by preheating your oven to 350F.  Then, melt your stick of butter in your large bowl.  It doesn't need to be entirely melted, but it won't matter if it is.  Just don't overcook it so much that some of the butter evaporates. 30-40 seconds should do it.

Once you've mostly melted the butter, add two large eggs.  Also add both cans of corn, without draining off any liquid.  (seriously, don't drain; it's really hard to adjust with the right amount of water if you mess this up).

Mix, mix.
Now add 8 oz of sour cream to the bowl. I typically prefer to use Daisy Light sour cream as it cuts the calories of the recipe without sacrificing flavor. (You can also leave off the butter if you really want to, but it affects flavor and fluffiness. Still tasty, but not the same. I discovered this accidentally. Heh heh). Lastly, pour in your box of corn muffin mix.  I typically use Jiffy, but I'm sure it'd work with another brand just fine.

Yay, pudding!
Turn your mixer on to a medium low speed, and mix the ingredients until they are thoroughly blended. It is especially important that the eggs and sour cream get fully mixed in, as they tend to be stubborn.  If you need to break things down further with a whisk, don't be afraid to. (Not mixing properly results in a lumpy pudding, and that's just wrong).

Pour the pudding batter into the 13 x 9 inch casserole dish.  Shake the dish slightly from side to side to get the batter to settle evenly into the dish. 

Bake at 350F for about 40-45 minutes, until the top of the pudding is a golden brown and lightly crusty.

This recipe doubles easily, which is what I typically do for holidays since the dish is so popular.  If you choose to double the recipe, use a 15 x 10" dish and cook for 1 hour to account for the extra volume.  This dish goes with pretty much anything, but pairs especially well with ham or a hearty meat chili.


Sunday, January 1, 2012

A Red Velvet Holiday

Happy New Year from The Book Pantry! This Christmas dinner, I served a Red Velvet Cake for dessert.  Red Velvet Cake is a southern tradition, although it seems pretty popular elsewhere, too. (And, really, what's not to like?). Mine is loosely based off a recipe for the cake in The Boozy Baker cookbook, to which I've made a few alterations of my own (mainly the type of alcohol and the amount of food coloring). The cream cheese icing recipe is my own, but there's only so many ways to make cream cheese icing, just saying.  This is a delicious and pretty cake sure to impress anyone you happen to serve it to.  Despite my usual low-tech approach to baking (enforced only because I lack toys), this recipe needs a mixer. You cannot mix the cake batter by hand and not over mix, thereby creating a tough cake.

What You'll Need
Supplies
2 nine inch cake pans                                          Measuring cups
Large mixing bowl                                              Measuring spoons
Medium mixing bowl                                           Mixing spoon
Small mixing bowl                                               Long serrated bread knife
Stand mixer                                                         Icing knife/spatula
Whisk                                                                  Cutting board
Cooking spray                                                      Chopping knife
Ingredients for Cake
3 cups cake flour                                                  1 tsp vanilla extract, running over
5 Tbsp cocoa powder                                           1 tsp white vinegar
1 1/2 tsp baking soda                                          3 oz red food coloring
1/2 tsp salt                                                           1 1/2 sticks unsalted butter, softened
3/4 cup buttermilk                                                2 cups sugar
1/4 cup rum                                                          3 eggs
Ingredients for Frosting
16 oz cream cheese, softened                               2 cups confectioner's sugar
2 sticks butter, softened                                       4 Tbsp vanilla
3 cups pecans

Now Let's Make Red Velvet Cake!
Preheat the oven to 350F.  Time for prep work: Remove your 16 oz of cream cheese and 2 sticks of butter from the refrigerator and set aside to soften until you're ready to do the icing. Also remove your 3 eggs so that they come close to room temperature by the time you need them.  Now, coarsely chop enough pecans to equal 3 cups: that's about 4 handfuls.

Spray your two cake pans with cooking spray.  Pour out a small pile of flour into each pan (click to enlarge photos for an example). Dust the pans with the flour by holding the pan up and tilted and tapping the bottom, rotating the pan as you go to allow a thorough coating.  Once the bottom of the pan is coated, continue this process with the remaining flour around the sides of the pan.  I recommend doing this over the kitchen sink, as it can get a little messy.  Set your coated pans aside.


Cocoa Powder! *shakes fist*
In your medium mixing bowl, measure out 3 cups cake flour, 5 Tbsp cocoa powder, 1 1/2 tsp baking soda, and 1/2 tsp salt.  Whisk the ingredients together until they are evenly distributed and there are no large cocoa powder lumps (cocoa powder is sneaky and devious; be thorough in your eradication). Set the dry ingredients aside. 

In your small mixing bowl, measure out 3/4 cup buttermilk (not that non-fat gunk, either; that defeats the purpose of buttermilk), 1/4 cup of rum, 1 tsp vanilla extract (allowing the vanilla to run over into the bowl slightly as you measure), 1 tsp of white vinegar, and 3 oz of red food coloring. Whisk the ingredients together until you have a (very red) smooth liquid mixture.  For a brighter cake add food more food coloring, but be aware that it affects flavor a little.  If you'd like to avoid food coloring altogether, puree 1-2 cooked beets. Keep in mind that the interaction between the buttermilk and the cocoa should achieve a slight red color as it is (woot! Chemistry!). Set the liquid mixture aside.

No shells in this cake!
Place 1 1/2 sticks of butter in your large mixing bowl.  Soften in the microwave if necessary, being careful not to fully melt the butter.  Using your mixer at a low speed (about 2 on mine), beat the 2 cups of sugar into the butter until fluffy. Then, add the eggs one at a time, beating after each addition. I recommend stopping the mixer for each egg addition, so that you can fish out any stray pieces of eggshell that might make their way into the batter. (Remember, an easy way to remove pesky shells is to wet your finger before trying).

Set your mixer to medium-low speed (about 4 on mine, but don't turn it on yet).  For this step you are going to gradually add the flour mixture and the buttermilk mixture, alternating between the two.  You want to do this is partial amounts; I typically wind up with four additions of each.  Start with the flour mixture and end with the buttermilk mixture to achieve the appropriate consistency for your batter. Be careful not to go too slowly and over mix your batter.  Over worked batter will result in a tough, chewy cake. (Blegh!)


Divide the cake batter between your two cake pans, scraping the bowl to get all the good bits. Lightly shake your pans from side to side to settle the batter evenly into the pans.  Bake at 350F for about 40 minutes.  Test the doneness of the cakes by inserting a toothpick (or fork prongs) into the center of the cake. Cakes are done when toothpick comes out clean.  Set cakes aside to cool.

Yes, it's upside down.
Once cakes are mostly cool, remove one cake from pan and place it on your icing station (work area, display, wherever you're planning to ice the cake).  Take your long serrated knife and evenly slice off the curved top of the cake, so that you'll have a flat bottom layer.  Offer the cake top to any circling family members that happen to be around. (Vultures!) Loosen the other cake in the pan, but leave in pan until cakes are completely cool.

Mmmmm... frosting.
While cakes are cooling the rest of the way. Wash out your large mixing bowl, so that you can begin whipping up the frosting.  Place your 16 oz of cream cheese, 2 sticks of butter, 2 cups of confectioner's sugar and 4 Tbsp of vanilla in the (now clean) bowl.  Stir the ingredients together with your mixing spoon until you have a thoroughly blended, smooth frosting. You can flavor the frosting with anything you'd like, simply replace the vanilla with your choice of flavor (lemon juice, more rum, orange liqueur, etc).

Spread some frosting on top of the already stationed cake.  (Do not do this if cake is not yet cool, or you'll have a melty, blobby cake and who wants that?). Smooth the frosting across the surface of the cake until you have a decent layer of frosting.  Remove the other cake layer from its pan and carefully place it centered over the bottom layer.  You can cut the top off this one, too, if you want a flat topped cake, but I never bother. Gently spread frosting over the entire cake, beginning with the top before moving on to the sides.  Try to avoid any bare or translucent spots where the cake shows through.  Once all the frosting is on the cake, smooth it out to make it purty.

Yum!
Now, take your chopped pecans and begin coating your cake.  Start with the top center and work your way outward.  You want some white to show through but don't want any bald spots, so try to be even handed.  "How do you coat the sides?" you ask. I grab a small handful of chopped pecans, get close to the cake and toss/press the nuts into the cake.  This is really messy, so have a broom handy (or a pecan loving dog, either will do).  
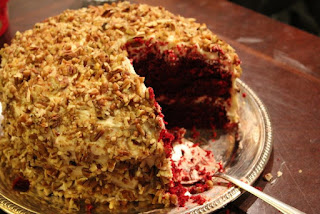
Isn't it pretty?!
Now, stand back and admire your handy work!  This cake goes really well with postprandial coffee.

Big thanks to my future step-brother, Stevie, for letting me use his Nikon and helping with the pictures. I'm actually in one! Le gasp.  Also, thank you to my lovely friend Jen for doing the second stage icing, thus preventing me from my annual apoplectic frosting rage.  


    Pin It

Sunday, December 4, 2011

Gobble Gobble

So what do you do with all those Thanksgiving leftovers (other than gorge yourself, of course)? While most of the leftovers are long gone by now in my family, there always seems to be a disproportionate amount of turkey still laying around.  Thus, every year Thanksgiving is followed by Turkey Pot Pie.  Really, this is a pretty versatile recipe and you can stretch any poultry leftovers this way.  I really think my family looks forward to this dinner almost as much as our Thanksgiving feast. Also, did you know that you can click on the photos in my blog to enlarge them? (Just saying...)

What You'll Need
Supplies
2 glass pie plates                                                          Can opener
Large mixing bowl                                                        Butter knife
Mixing spoon                                                                 Kitchen scale (optional)
Ingredients
4 pie crusts                                                                    1 can green peas
1 can cream of celery soup                                            2 tsp minced garlic
1 lb. leftover turkey                                                       Rosemary
1 can whole-kernel corn                                                Marjoram
1 can french-cut green beans                                        Salt and pepper

Now Let's Make Turkey Pot Pie!
To start, preheat your oven to 375F.  Open all your cans of vegetables and drain them.  (Do not try to drain the cream of celery soup - accidentally or intentionally). Set the cans aside.  If you're using whole garlic, mince two cloves to equal about two teaspoons of garlic.  Set this aside as well.

Put 1 crust in each of your two pie plates (two crusts = two pie plates). Press the crust down into the plate, so that it is fitted to the sides and bottom of the glass.  Trim any excess pie crust from the pie, using your butter knife.  Cut the crust right at the edge of the glass; there should be no crust hanging out of the pie plate by the time your done.  This isn't really a necessary step, if you'd prefer to do a decorative crust, instead, but it does significantly trim the amount of fat and calories in the recipe. (And, let's face it, after Thanksgiving we need all the help we can get). Once you've trimmed both crusts, set them aside.


Veggies!
In your large mixing bowl, combine the drained vegetables, garlic, and cream of celery soup.  Stir it together until the vegetables are well dispersed and thoroughly coated with cream of celery soup. (You can also cut a few calories here if you're really concerned by using Campbell's 98% fat free soup). This will create a fairly thick vegetable mixture. As you're mixing, be careful not to overdo it and squish all the veggies; they should be distinguishable (we're not making a mash here)

Gobble... gobble?
Take your leftover turkey meat and begin pulling it apart so that it is in large shredded pieces. Measure out 1 pound (16 ounces) of meat. This is where your kitchen scale will come in handy, because 1 lb. really is the perfect amount, but if you don't own a kitchen scale, don't stress it.  Just eyeball it (isn't that a tasty expression; totally appropriate for a cooking blog) and measure as closely as you can.  When you're measuring out your meat, try to get as much white meat as you can, since dark meat will make for a much gamier pie (unless you go for that sort of flavor). Also, do not let any bones or skin get in with the meat you plan to add.  Bones obviously pose a danger, and getting a hunk of turkey skin when you think you're getting meat is nasty (or gag-worthy, as the case was may be)

Once you've got your meat parceled out, add it to the vegetable mixture and stir it in. Add marjoram, rosemary, salt and pepper to taste.  I usually add about 1 1/2 Tbsp marjoram and 3/4 Tbsp rosemary, but I typically just throw it in on instinct, so it's hard to give a precise measurement.  Again, make sure that you thoroughly mix everything together.  Divide the mixture evenly between the two pie shells.  Spread the filling into all corners of the pie crusts, but if it's very full try to pile the larger amount in the center of the pie.


Top each pie with your remaining pie crusts. Firmly press the top crusts against the edges of the bottom crust using your fingers in order to seal the edges together. Work your way around the pie, until the edges are completely sealed.  Trim off all excess pie crust.  To finish the sealing process (and to make it purty) press a fork along the edges, working your way all the way around the pie.


Use your butter knife to poke holes in the top of the pie crust in order to release any steam or air that might build up as the pie cooks.  Try to do this in some pattern to increase the decorative effect.  Bake the pie at 375F for about 35-40 minutes, until the top crust is golden brown with no raw spots (raw spots look a little translucent compared to other areas of the crust). Remove the pies from the oven and let cool for 10-15 minutes (or as long as you can stand to wait).


Turkey Pot Pie with Gravy
A serving size is about a quarter of a pie. It pairs nicely with salad or other Thanksgiving leftovers.  I like to top mine with a little shredded cheddar cheese, but it's also delicious with a little leftover gravy. (This picture is sponsored by my Da, who had to wait to eat not-so-patiently as I got the shot just right).


Sunday, November 27, 2011

Turkey Day Gorging Part I

As you might have guessed, I cook Thanksgiving dinner in my family.  I love making huge feasts, setting the table with nice stuff and generally enjoying a big family meal.  Oh and the holiday magazines!  I love trying out recipes from magazines (and, you know, using my family as guinea pigs).  Today's featured recipe came out of said holiday magazine (okay, so technically it was on their website!): Grandma Erma's Spirited Cranberry Sauce, submitted by Leslie Sutherland of Fort Worth Texas to Southern Living.  I have long hated cranberry sauce (glaring at the previously canned blob from across the table each Thanksgiving) and been puzzled as to why it was a Thanksgiving staple.  Last year, I wanted to make some from scratch but was talked out of it after being told what a pain in the patootie it was.  This year I stuck to my guns, did my research and found Grandma Erma's delicious cranberry sauce, which is exceedingly nom-worthy.

What You'll Need
Supplies
3 quart saucepan                                                        Blender or Food Processor
Stirring spoon                                                             Air tight storage container
Measuring cups
Ingredients
4 cups fresh cranberries                                             1/2 cup port
2 cups sugar                                                                1/4 cup orange liqueur
3/4 cup water

Now Let's Make Grandma Erma's Spirited Cranberry Sauce!
Please visit the site for the original recipe, linked above; below is my own rendition with details (as usual) based on the cooking experience. 

Begin by measuring out 4 cups of cranberries.  This is about 1 2/3 bags of Oceanspray cranberries; I have a 4 cup Pyrex measuring cup, that I filled up to the brim, which is slightly more than 4 cups. (greedy, greedy) Set the cranberries aside.

Cranberries!
In your 3-qt saucepan, combine 2 cups sugar, 1/2 cup port, and 3/4 cup water, stir until well mixed and sugar has begun to dissolve.  Don't worry too much about the quality of the port, either (unless you want to/can afford to); I used a cheap port picked up in my local grocery store (granted, it was the only one they had...).  Add your cranberries and stir the mixture around a bit.

Heat the mixture over medium high heat. To begin with you will have many more cranberries than liquid, so don't worry. The cranberries will cook down a bit.  Bring the mixture to a boil, stirring frequently.  Cook until the cranberries begin to crack.  The original recipe says to cook for about 8-10 minutes; I found that mine took about 10.  Don't pull it off the heat at the first sign of cracking, let the majority of the cranberries split open first. Once this has happened, remove it from the heat and let it cool at least 15 minutes.


Now pulse!
Once the cranberries have cooled, pour the mixture into your blender or food processor (hold the lid down tightly if you use a blender; ask me how I know). Blend the mixture on a low setting until the cranberries have reached your desired consistency.  This can be pureed, as the original recipe recommends, or you can leave some the cranberries still partially in tact (as I prefer).

Pour this into the storage container, and stir in 1/4 cup of orange liqueur.  Southern Living tested with Grand Marnier, but I used Gran Gala, so I doubt brand matters too much. Seal the container and chill for at least 8 hours before serving.  I made mine two days before the big day. Serve with your favorite feast (or feast leftovers, as the case may be); I know I'll be whipping it up again for Christmas.  This recipe took me for a 180; I now eye cranberry sauce with longing rather than loathing. And, it was super easy, too.

Om nom nom