Showing posts with label easy. Show all posts

Sunday, September 23, 2012

Slow Cooker Surprise

Okay, okay, so it's beef stew, which is not all that surprising, really.  The main point is that I finally got a slow cooker, so you can expect lots of those recipes in the future. I want to try a chicken curry, next I think...  This recipe is definitely a whatever you've got on hand sort of recipe. I pretty much made it up as I went, but it sure turned out tasty!

What You'll Need
Supplies
Slow Cooker (at least 4qt)                                                                  Large mixing bowl
Cutting board                                                                  Spoon
Knife for chopping                                                          Measuring cups
Ingredients
1/2 large white onion                                                      Marjoram
1 large potato                                                                  Rosemary
1 lb stew meat                                                                 Thyme
1/4 cup flour                                                                   1 can green beans
1/3 red bell pepper                                                          1 can diced tomatoes
Baby carrots                                                                    1 tsp minced garlic
Chili powder                                                                   2 cups beef broth
Bay leaves                                                                       Salt and pepper

Now Let's Make Beef Stew!
Start by prepping your vegetables. Roughly chop 1/2 white onion and the potato (which you've totally scrubbed, right?). Place the two vegetables in the bottom of your slow cooker.

This layer prevents your meat from cooking its fat.

Next, place your 1 lb stew meat in the large mixing bowl, breaking it up with your spoon. Measure out 1/4 cup flour and pour it into the bowl with the meat. Stir the meat, allowing the flour to thoroughly coat each piece of stew meat. Add the stew meat to the slow cooker on top of the potatoes and onions.

The flour will help the meat brown (since we're not searing) and will thicken the stew 

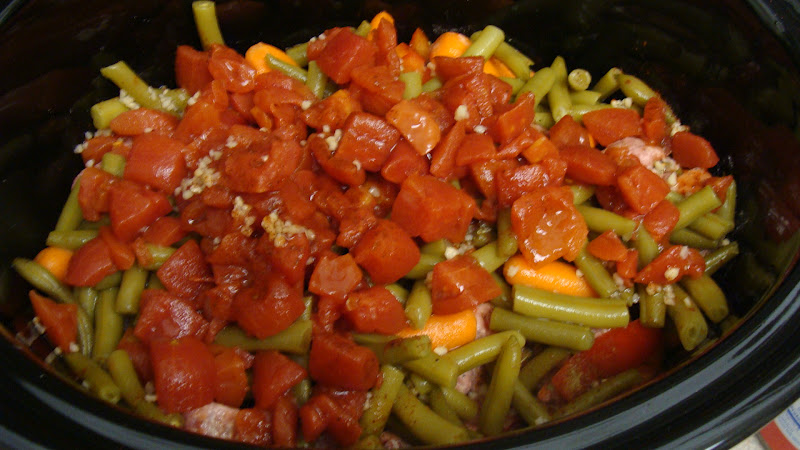
Dice the 1/3 red bell pepper and add it on top of the meat. Also add a couple handfuls of baby carrots.

I know, I'm getting crazy technical here.

I like to add my spices next so that they're midway through the layers and cook into everything. Liberally dash chili powder around the mixture in the slow cooker. Next add bay leaves, I did a couple dashes of crushed leaves, because that's what I had on hand. If you're using whole leaves 2 should do. Add about 1 tsp marjoram, 1 tsp rosemary, and 1/2 tsp thyme. (I was not that precise, so feel free to loosen up a bit and do some dashes and pinches instead).

Herby
Open and drain the can of green beans and add it to the pot. Add the diced tomatoes along with there juice (aka don't drain those).


Top it all off with 2 cups beef broth, 1 tsp minced garlic, and salt and pepper to taste.

Hmmm... broth appears to be camera shy...

Cover and cook on low for 10 hours. At 10 hours switch setting to keep warm (I got off late the night I cooked this, so it cooked for 2 extra hours, which is why there's not as much liquid in the photo; it was still delicious.) Serve with a hearty bread and enjoy.  If you can't make it the morning of, whip it up the night before, and store it in the fridge, then transfer to the slow cooker in the morning.


Sunday, September 16, 2012

Super Easy Sunday: An Appealing Appetizer

Yeah, so I said I'd be doing a slow cooker recipe; about that.... it usually helps if you remember to throw it together in time before you leave for work. Oops.  Next Sunday? That gives me a whole week to get used to the slow cooker concept.

Anywho, our pinch hitter for the night is the Ranch Cheese Ball.  I've been saving this one especially for football season, and what better way to celebrate Alabama's latest win, yes? (Or Auburn's, you know, if you swing that way; no sides here). This is a great recipe for hosting those football gatherings: easy to whip up and hard to knock over as you scream and wildly gesticulate at the television (you know who you are...).

What You'll Need
Supplies
Large mixing bowl                                                    Wooden mixing spoon
Cutting board                                                             Measuring cups
Knife for dicing
Ingredients
8 oz cream cheese                                                      1 small packet ranch mix
1/3 cup red bell pepper                                              8 oz shredded cheddar
1/2 cup onion                                                            Flour
1/2 cup pecans + some for rolling

Now Let's Make a Ranch Cheese Ball
Unwrap and place 8 oz of cream cheese in the large mixing bowl.  Reduced fat cream cheese works as well as regular, but I'd steer clear of fat free. Soften your cream cheese, if it isn't already. I usually leave mine out to let it soften, but a short stay in the microwave will do the trick.

Oh, cheese blob, just look at you, so blobby
Dice enough red bell pepper to make 1/3 cup. Add to bowl.  Next, dice enough onion to fill a 1/2 cup, and add it to the bowl.  Then measure out 1/2 cup of pecan chips and add them to the bowl. If you chop your own pecans, just make sure to get them very fine.  Lastly, add the small packet of dry ranch mix. Use your wooden spoon to whip the ingredients together. Make sure to mix them thoroughly as you don't want any large areas of a single ingredients. Scrape the sides of the bowl occasionally to prevent the ranch mix from escaping the mixing process. (Watch it, it's sneaky).

Note the red spoon, which swiftly transforms to wood
in the next photo. Magic!
Once you're all mixed, add 8 oz of shredded cheddar cheese.  I use pre-shredded for this instead of my usual hand shredded; it's easier and doesn't seem to have any effect. Use your favorite cheese or cheese blend, but note that sharper is better. Blend the cheese into the cream cheese mixture. Once mixed, microwave the cheese for about 20-30 seconds to melt the shredded cheese into the rest a bit and mix again.

Mmmm.... cheese
Form the cheese into a rough ball in the bottom of the bowl, using your spoon to shape it. Wipe down your cutting board and spread out some more pecan chips. I used about another 1/2 cup.  Spoon the cheese out of the bowl and onto the pecan chips, keeping in ball form as much as you can. Lightly flour your hands and shape to cheese into a more distinct ball shape, rolling it in the pecans to completely coat the outside of the ball.

Yes, I got pecans EVERYWHERE.

Place on serving plate and refrigerate until ready to serve. Serve with your choice of crackers. Enjoy!


Sunday, September 2, 2012

Homemade Hash Browns

I haven't done a side dish post in quite some time. This recipe is pretty basic and serves about four people. The Hash Browny result can be served either as a breakfast item or as a dinner side. I love them either way, but most recently I served them up alongside my Chicken Berlin. Nom.

What You'll Need
Supplies
Cutting board                                                             Large pan
Knife for dicing                                                         Spatula
Ingredients
2 large baking potatoes                                              Salt
2 tbsp butter                                                               Pepper

    Now Let's Make Homemade Hash Browns
Start by thoroughly scrubbing the outside of your potatoes.  You want to get as much dirt and yuck off as possible. I leave my peels on for the recipe, but if it really bugs you feel free to peel your potatoes. However, for Hash Brown purposes, peeling is mostly a waste of time.

Take one of your potatoes, and slice in half lengthways. Then slice that in half across the width.  Slice your potato along the length with about 1/2 inch between your cuts. Keep your slices together. Then turn the potato and cut across the width. Break those pieces up and cut them until you have a medium dice. Repeat until all your potatoes are diced.


Heat the large pan over medium heat. When the pan reaches temperature, add 2 Tbsp butter and allow it to melt. Twist and tip your pan to allow the butter to thoroughly coat the bottom.


Now, add your potatoes. You want to add salt and pepper to taste. I don't typically add more than 3/4 to 1 tsp of salt. I'm very liberal with the pepper, though.  Saute the potatoes, moving them around regularly with the spatula to ensure even cooking.


Keep cooking the potatoes until they are brown, tender and slightly translucent looking.  Test a few larger pieces to ensure that none of the potatoes are still crunchy. Plate and serve! You now have a tasty, easy side dish to accompany your meal.


Sunday, August 5, 2012

Super Easy Sunday: Poor Boy Cake

As usual on a Sunday I've worked, the last thing I wanted to do tonight was get in the kitchen.  Time to pull a easy recipe out of my hat.  This one is so easy, it hardly qualifies as a recipe really (but hey, I'm shameless).  Tonight, I made a Poor Boy Cake.  I've been making this cake with only small alterations since I started cooking; it was one of the first things I learned to make (aaaahhhh, nostalgia *tear*).  A little online research reveals a lot of variation for this cake, so let's just call this my version and leave it at that.

What You'll Need
Supplies
Large mixing bowl                                                        13 x 9" casserole dish
Mixing spoon                                                                Fork
Cooking spray
Ingredients
Box chocolate cake mix                                                 Water
Eggs                                                                               14 oz can sweetened condensed milk
Vegetable Oil

Now Let's Make Poor Boy Cake
Preheat your oven according to the directions on the box. Yep, that's right: boxed cake mix.  Choose your favorite chocolate variety, or if you have a basic chocolate cake recipe, use that.  


Prepare the cake batter according to the directions on the box. Most basic box mixes call for a combo of eggs, water, and vegetable oil, so that's what I listed above. Use the amounts indicated on the box.


Pour the batter into the 13 x 9" casserole dish, scraping the bowl. Tilt the casserole from side to side and corner to corner to force the batter to spread out thoroughly. Bake according to the time listed on the back of the box. Do not overcook. Cake is done when a knife inserted comes out clean.


Allow cake to cool slightly, about 5 minutes.  Take your fork and stab the cake until it is covered in holes (make like a senator in Julius Caesar). Open the can of sweetened condensed milk and pour over the top of the cake. 

 Et tu, Brute?


Allow the milk to settle into the cake and the cake to cool. Serve and enjoy! It goes great with vanilla ice cream.

It's not a pretty cake, but it's a tasty one!


Sunday, May 20, 2012

It's a Brownie Kind of Day

I haven't baked anything in a while, have I? I thought it was about time, and what's better than a chocolaty  brownie? (Nothing, that's what).  This is a recipe for a basic brownie that I threw together after some experimentation.  It gets a nice crust around the edges (totally the best part, right?) and stays nice and moist on the inside. I don't like fudgy brownies, myself, so these hover somewhere between fudgy and cake-like. If you like yours even more cake-like, add an extra egg.

What You'll Need
Supplies
Large mixing bowl                                                          Measuring cups
Small mixing bowl                                                           Measuring spoons
Mixing spoon                                                                   13 x 9 inch casserole dish
Whisk                                                                              Cooking spray
Butter knife
Ingredients
2 sticks butter                                                                  2/3 cup cocoa powder
1 cup sugar                                                                      1 cup flour
1 cup light brown sugar                                                  1/2 tsp salt
4 eggs                                                                              1/2 tsp baking powder
2 tsp vanilla

Now Let's Make Brownies!
Start by preheating your oven to 350F.

Mmmm, buttah!
Unwrap your two sticks of butter (that's 8 oz or 1 cup in case you were wondering) and cut them into pieces into your large mixing bowl. Place the bowl in the microwave and melt the butter. About 45 - 60 seconds should do the trick; just watch it carefully and remove it if it starts making popping noises. Set aside.

Crack four eggs into the small mixing bowl. Remove any stray shell and whisk the eggs together until the yolks and the whites are blended. Add the eggs to the butter.  Measure 1 cup of sugar and add it to the butter.  Next, measure 1 cup of light brown sugar, making sure to pack the sugar into the measuring cup; add it to the butter.  Take your spoon and mix the butter, eggs, and sugars together until they are completely blended. The eggs will resist slightly, but you don't want any areas where the ingredients are still separated (put those eggs in their place).

 Click photos to enlarge!

Measure 2/3 cup of cocoa powder, 1 cup flour, 1/2 tsp salt and 1/2 tsp baking powder, adding each to the large bowl as you go.  Mix the ingredients together thoroughly. When you're done check for pockets of dry ingredients; no one likes lumpy brownies. This is also your chance to add any additional ingredients you might want to the brownies. I recommend 1 cup of any of the following: chocolate chips, butterscotch chips, walnuts, pecans.  (Whatever tickles your fancy, really).

 Seriously, click! Who doesn't want a Brownie slideshow?

Prepare your baking pan or casserole dish by spraying it with cooking spray.  Make sure to get the sides as well.  Spoon the batter into the pan, making sure to scrape as much of the batter off the sides of the bowl as possible.  Since the batter is so thick, use the back of your mixing spoon to spread it evenly around the casserole dish. 

Bake at 350F for about 30 - 35 minutes. Mine are always done right between those two numbers.  Test the brownies doneness by inserting your butter knife into the center of the brownies. If the knife come out clean, you're good to go. If not, give the brownies a few more minutes.  You don't want to overcook your brownies (cause tough, burnt brownies are just not tasty), but you don't want to stab them to death either, so use moderation when checking.  Remove and allow brownies to cool before cutting them into squares. Serve and enjoy!

Sorry, the lighting is nonexistent in my living room.


Sunday, April 29, 2012

Tastes Like Chicken!

Because it is.  (Bwahahahahaaa! I'm hi-larious) Tonight's recipe features something super easy and fast.  Why? Because a) I'm still sick (*hack, cough, hack*) and b) I just got off work.  You have those sort of days, too, right? RIGHT?! Ah, I thought so. Without further ado, I give you Work-Night Chicken Quesadillas.

What You'll Need
Supplies
Cutting board                                                                 Large skillet
2 forks                                                                           Cast iron griddle
Knife
Ingredients
1 rotisserie chicken                                                        1 tsp minced garlic
Tortillas                                                                          Chili powder
Shredded cheese                                                             Cilantro
1 Tbsp olive oil

Now Let's Make Work-Night Chicken Quesadillas!
Put your rotisserie chicken on your cutting board. Slice slightly to one side of the center of the chicken to begin removing the breast.  Don't worry if you're not a master carver; it doesn't need to be pretty.  Take your chicken breast, and remove any of the skin still attached (no one wants to get a big hunk of rubbery skin in their quesadilla. Trust me, learn from me). Now, use one of your forks to hold the piece of chicken down.  Take your other fork and firmly drag it across the piece of chicken to begin shredding the chicken. Continue until the entire breast is shredded.  Repeat for the other chicken breast and any other meat you can/want to pull off the chicken.

 Remember, click to enlarge for a closer view!

Set your cast iron griddle on an eye and heat it to medium heat (about four or five). Now ignore it and move over to your skillet.

In your skillet, heat about 1 Tbsp olive oil over medium heat. Add your newly shredded chicken and 1 tsp of minced garlic.  Add chili powder to taste. Personally, I like a lot.  If you have time and are so inclined, you could also add half a diced bell pepper. Saute the meat until it is heated throughout and flavors have mingled.  Reduce heat to low.

Come back to your griddle.  By now, it should have reached an even heat.  Place a tortilla on the griddle.  Sprinkle with shredded cheese as desired and add a few cilantro leaves as well. Watch as the cheese slowly melts. Once all the cheese is melted, add chicken to the center of the tortilla. Make sure to divvy up the chicken based on however many quesadillas you're prepping.


Okay, so I used a spatula.
Using one of your forks, fold one side of the tortilla over the chicken in the center. Then, fold the other side over. Remove to plate. Add another tortilla and repeat until all your chicken is used up. Serve with a salsa and sour cream. Some other ingredients you can add right before wrapping the tortilla up? Freshly diced tomatoes, sliced red onion, chopped lettuce, olives, etc.  Enjoy!


Sunday, April 8, 2012

It's an Easter Fiesta!

Cause, you know, what says Easter Sunday dinner like Chicken Empanada? Am I right? (What's that? I'm not?).  Okay, okay, I'm joking. This is actually a great recipe for the day or two after you've prepared a big feast, when what you really need is a break from the kitchen (Easter, Passover, Spring Equinox, whatevs).  This particular Chicken Empanada recipe is super easy and quick. Oh, and it's delicious, just saying.

What You'll Need
Supplies
Cast iron skillet                                                              Pan for sauteing
2 Forks                                                                           Large mixing bowl
Cutting board                                                                 Mixing spoon
Knife for chopping                                                          2 cookie sheets
Ingredients
3 chicken breasts                                                           1/2 red bell pepper
Olive oil                                                                           1 can Campbell's cheddar cheese
Chili powder                                                                    Shredded cheddar cheese
Garlic powder                                                                  2 boxes pie crusts
1/2 yellow onion                                                             

Now Let's Make Chicken Empanada!
Start by cooking your chicken. Drizzle some olive oil into your cast iron skillet.  Roll your chicken breasts through the olive oil to coat all sides, then arrange them flat side down in the skillet.  Lightly sprinkle the chicken with garlic powder, then liberally sprinkle them with chili powder. Bake at 375F until the chicken is cooked and white throughout (there should be absolutely no pink, unless you want to spend a couple days worshipping the porcelain gods).  I like to do this step with whatever I'm cooking the night before, so that the chicken is ready to go the next day. If you have any left over (ie from a roast), feel free to skip this step and use that instead, just know that you need about a 14 - 16 oz of meat.


Insert witty caption here.
If your oven isn't still set to 375F, begin preheating it now. Using your two forks, begin shredding the chicken.  Use one fork to hold the chicken breast in place.  Firmly drag the other fork across the chicken breast, using it as a claw to pull the chicken apart.  Try not to shred the chicken too finely; you want bite size pieces of chicken. Repeat this process until all your chicken is shredded. If you're working with leftovers of a whole chicken the process is similar, although you may be pulling pieces of the appropriate size directly from the chicken. Place the shredded chicken in your large mixing bowl.

Take out the pan you plan to use for sauteing and warm a small amount of olive oil in it over medium heat. While the oil warms, dice your onion.  Cut off the non-root end, then moving around the onion make even cuts that stop just shy of the root.  Then, root-end facing away from your knife, begin chopping the onion for a quick dice.  Add half the onion to the pan (reserve the other half for another cooking adventure).  


Next, begin dicing your red bell pepper.  Cut the pepper in half, reserving one half for another day.  Remove the stem and carefully cut away the seeded white part from the inside of the pepper. You should only have red left by the time you're done (do not skip this step; the white flesh can be really bitter. Patooie!).  Holding the pepper down with one hand, make vertical slices that run the length of the pepper (starting from the stem end and going down, as opposed to across the pepper; click to enlarge the picture).  Gather your slices into a bunch and cut across them to dice the pepper.  Add this to the pan with the onion and saute until tender. 


Sorry for the blur.
Once the onion and pepper are mostly tender, add them to the mixing bowl with the chicken.  Open the can of cheddar cheese and add it to the bowl. Add chili powder to taste.  I usually add a lot; at least another tablespoon.  You want enough so that the chili powder is visibly and liberally dispersed throughout the mixture.  Mix everything together thoroughly.  

Mmmm. Cheesy.
Spread a pie crust flat on each of your cookie sheets (a wider sheet definitely helps).  Spread the chicken and cheese mixture evenly over each of the pie crusts leaving about an inch to spare all around the outer edge. Top with a layer of shredded cheese. This recipe calls for cheddar, because that's what you'll see pictured. However, a colby monterrey-jack blend is also very tasty.  You can either shred your own or use pre-shredded.  

Place another pie crust over the top of the filling.  Seal the edges together by pressing around the outer edge with your fingers.  Try to get as close to the filling as possible with your seal, but don't actually press on the filling part (this will cause an explosion; ask me how I know).  Trim the excess pie crust from around the edge, then seal more firmly by pressing one of your forks along the edge of the crust. Reserve any excess crust for another recipe (waste not! You could turn this into tartlets or turnovers). Using the fork, poke a few holes in the top. Repeat for the other empanada.


Bake at 375F for about 30-40 minutes until the top has turned a nice golden brown.  Serve with a dollop of sour cream and garnish with fresh cilantro.  Yum! (I may or may not have been too busy nomming this to get a good picture of it on the plate all pretty. Heh heh).