Showing posts with label savory. Show all posts

Sunday, April 8, 2012

It's an Easter Fiesta!

Cause, you know, what says Easter Sunday dinner like Chicken Empanada? Am I right? (What's that? I'm not?).  Okay, okay, I'm joking. This is actually a great recipe for the day or two after you've prepared a big feast, when what you really need is a break from the kitchen (Easter, Passover, Spring Equinox, whatevs).  This particular Chicken Empanada recipe is super easy and quick. Oh, and it's delicious, just saying.

What You'll Need
Supplies
Cast iron skillet                                                              Pan for sauteing
2 Forks                                                                           Large mixing bowl
Cutting board                                                                 Mixing spoon
Knife for chopping                                                          2 cookie sheets
Ingredients
3 chicken breasts                                                           1/2 red bell pepper
Olive oil                                                                           1 can Campbell's cheddar cheese
Chili powder                                                                    Shredded cheddar cheese
Garlic powder                                                                  2 boxes pie crusts
1/2 yellow onion                                                             

Now Let's Make Chicken Empanada!
Start by cooking your chicken. Drizzle some olive oil into your cast iron skillet.  Roll your chicken breasts through the olive oil to coat all sides, then arrange them flat side down in the skillet.  Lightly sprinkle the chicken with garlic powder, then liberally sprinkle them with chili powder. Bake at 375F until the chicken is cooked and white throughout (there should be absolutely no pink, unless you want to spend a couple days worshipping the porcelain gods).  I like to do this step with whatever I'm cooking the night before, so that the chicken is ready to go the next day. If you have any left over (ie from a roast), feel free to skip this step and use that instead, just know that you need about a 14 - 16 oz of meat.


Insert witty caption here.
If your oven isn't still set to 375F, begin preheating it now. Using your two forks, begin shredding the chicken.  Use one fork to hold the chicken breast in place.  Firmly drag the other fork across the chicken breast, using it as a claw to pull the chicken apart.  Try not to shred the chicken too finely; you want bite size pieces of chicken. Repeat this process until all your chicken is shredded. If you're working with leftovers of a whole chicken the process is similar, although you may be pulling pieces of the appropriate size directly from the chicken. Place the shredded chicken in your large mixing bowl.

Take out the pan you plan to use for sauteing and warm a small amount of olive oil in it over medium heat. While the oil warms, dice your onion.  Cut off the non-root end, then moving around the onion make even cuts that stop just shy of the root.  Then, root-end facing away from your knife, begin chopping the onion for a quick dice.  Add half the onion to the pan (reserve the other half for another cooking adventure).  


Next, begin dicing your red bell pepper.  Cut the pepper in half, reserving one half for another day.  Remove the stem and carefully cut away the seeded white part from the inside of the pepper. You should only have red left by the time you're done (do not skip this step; the white flesh can be really bitter. Patooie!).  Holding the pepper down with one hand, make vertical slices that run the length of the pepper (starting from the stem end and going down, as opposed to across the pepper; click to enlarge the picture).  Gather your slices into a bunch and cut across them to dice the pepper.  Add this to the pan with the onion and saute until tender. 


Sorry for the blur.
Once the onion and pepper are mostly tender, add them to the mixing bowl with the chicken.  Open the can of cheddar cheese and add it to the bowl. Add chili powder to taste.  I usually add a lot; at least another tablespoon.  You want enough so that the chili powder is visibly and liberally dispersed throughout the mixture.  Mix everything together thoroughly.  

Mmmm. Cheesy.
Spread a pie crust flat on each of your cookie sheets (a wider sheet definitely helps).  Spread the chicken and cheese mixture evenly over each of the pie crusts leaving about an inch to spare all around the outer edge. Top with a layer of shredded cheese. This recipe calls for cheddar, because that's what you'll see pictured. However, a colby monterrey-jack blend is also very tasty.  You can either shred your own or use pre-shredded.  

Place another pie crust over the top of the filling.  Seal the edges together by pressing around the outer edge with your fingers.  Try to get as close to the filling as possible with your seal, but don't actually press on the filling part (this will cause an explosion; ask me how I know).  Trim the excess pie crust from around the edge, then seal more firmly by pressing one of your forks along the edge of the crust. Reserve any excess crust for another recipe (waste not! You could turn this into tartlets or turnovers). Using the fork, poke a few holes in the top. Repeat for the other empanada.


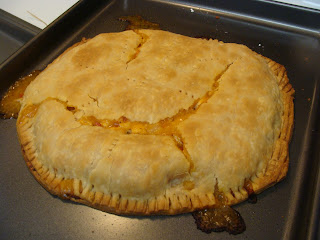
Bake at 375F for about 30-40 minutes until the top has turned a nice golden brown.  Serve with a dollop of sour cream and garnish with fresh cilantro.  Yum! (I may or may not have been too busy nomming this to get a good picture of it on the plate all pretty. Heh heh).


Sunday, March 4, 2012

Don't Let Your Flapjacks Flop!

Although, who doesn't like a good pancake? Unless, of course, you've burned them (I've never done that. Nope!). Pancakes are practically a world-wide dish, too, which is pretty cool; seriously, check out the Wikipedia page, which is . . . impressive. This is one of the first things I learned to cook, so this particular recipe is the result of plenty of practice and, well, flops. So, this is the recipe for my super-fluffy Buttermilk Pancakes; it makes about 6-8 flapjacks, depending on how good you are at stretching the batter (I'm not, and I always wind up with an awkward 7).

What You'll Need
Supplies
Medium mixing bowl                                                   Large mixing bowl
Measuring cups (Liquid and Dry)                                 Ladle
Measuring spoons                                                       Cast iron skillet or griddle
Whisk                                                                          Topping(s) of choice
Ingredients
2 cups all-purpose flour                                               1 tsp salt
2 Tbsp sugar                                                               2 large eggs
2 tsp baking powder                                                    3 Tbsp butter
1 tsp baking soda                                                         1 3/4 cup buttermilk

Now Let's Make Buttermilk Pancakes!
Take your medium mixing bowl and measure out 2 cups all-purpose flour, 2 Tbsp sugar, 2 tsp baking powder, 1 tsp baking soda, and 1 tsp salt. (Do NOT confuse the powder and the soda! Again, I've never done this).  Whisk the dry ingredients together until there are no lumps and the texture is quite fine.  Set aside.

Now, melt 3 Tbsp butter.  While butter is melting, crack the 2 large eggs into your large mixing bowl. Remove shell if necessary and beat the eggs with the whisk until yolks and whites are blended.  Add the melted butter.  Shake the buttermilk and measure out 1 3/4 cup, pouring it into the bowl. Whisk all the wet ingredients together vigorously until they are thoroughly mixed.


Add the bowl of dry ingredients to the bowl of wet.  Whisk until all of the dry ingredients are mixed in and there are no lumps.  Try not to beat overly long, as this could result in a tough pancakes (and no one likes a pancake that gives you lip). The batter should be thick but pourable; if the batter is too thick, add buttermilk in very small amounts, mixing after each addition, until you reach the proper consistency. Be careful, it's really easy to overdo and get runny batter. (And, like snotty eggs, runny batter is just wrong).


Try not to burn the paper. Heh heh.
Set the batter aside and heat your skillet/griddle (cooking instrument of choice) to medium-low heat.  On my stove, anything above 3 results in burnt crisps (which couldn't flop if they wanted to, but suck nonetheless). Ultimately, you'll just have to know your stove. While your griddle heats, allow the batter to rest; this will help encourage overall fluffiness. Your griddle is ready when butter sizzles on it. Speaking of butter . . . take the rest of the stick that you cut the 3 Tbsp from and peel back the paper. Apply butter to the pan between each pancake as you cook using this stick (see photo).

Ladle pancake batter onto the buttered skillet.  Allow the flapjack to cook on one side until bubbles begin to surface on the uncooked side of the pancake.  This will be most pronounced around the edges. Pancake is ready to flip when the edge can be easily lifted without batter sticking to the spatula.  The color of the cooked side should be a deep golden brown.  Cook the other side of the pancake until it matches the top in color. Repeat until all batter is used.


Stack the flapjacks and serve with your choice of toppings.  I prefer powdered sugar, but my boyfriend likes maple syrup.  Other tasty options: fresh fruit, fruit sauce, whipped cream, jams and preserves, marshmallow cream, chocolate, nutella, caramel and nuts.  Also, because this pancake is not particularly sweet in and of itself, you can also it with savory toppings and/or dishes (I totally want to try this soon!).


  Pin It