Showing posts with label cheesy. Show all posts

Sunday, April 8, 2012

It's an Easter Fiesta!

Cause, you know, what says Easter Sunday dinner like Chicken Empanada? Am I right? (What's that? I'm not?).  Okay, okay, I'm joking. This is actually a great recipe for the day or two after you've prepared a big feast, when what you really need is a break from the kitchen (Easter, Passover, Spring Equinox, whatevs).  This particular Chicken Empanada recipe is super easy and quick. Oh, and it's delicious, just saying.

What You'll Need
Supplies
Cast iron skillet                                                              Pan for sauteing
2 Forks                                                                           Large mixing bowl
Cutting board                                                                 Mixing spoon
Knife for chopping                                                          2 cookie sheets
Ingredients
3 chicken breasts                                                           1/2 red bell pepper
Olive oil                                                                           1 can Campbell's cheddar cheese
Chili powder                                                                    Shredded cheddar cheese
Garlic powder                                                                  2 boxes pie crusts
1/2 yellow onion                                                             

Now Let's Make Chicken Empanada!
Start by cooking your chicken. Drizzle some olive oil into your cast iron skillet.  Roll your chicken breasts through the olive oil to coat all sides, then arrange them flat side down in the skillet.  Lightly sprinkle the chicken with garlic powder, then liberally sprinkle them with chili powder. Bake at 375F until the chicken is cooked and white throughout (there should be absolutely no pink, unless you want to spend a couple days worshipping the porcelain gods).  I like to do this step with whatever I'm cooking the night before, so that the chicken is ready to go the next day. If you have any left over (ie from a roast), feel free to skip this step and use that instead, just know that you need about a 14 - 16 oz of meat.


Insert witty caption here.
If your oven isn't still set to 375F, begin preheating it now. Using your two forks, begin shredding the chicken.  Use one fork to hold the chicken breast in place.  Firmly drag the other fork across the chicken breast, using it as a claw to pull the chicken apart.  Try not to shred the chicken too finely; you want bite size pieces of chicken. Repeat this process until all your chicken is shredded. If you're working with leftovers of a whole chicken the process is similar, although you may be pulling pieces of the appropriate size directly from the chicken. Place the shredded chicken in your large mixing bowl.

Take out the pan you plan to use for sauteing and warm a small amount of olive oil in it over medium heat. While the oil warms, dice your onion.  Cut off the non-root end, then moving around the onion make even cuts that stop just shy of the root.  Then, root-end facing away from your knife, begin chopping the onion for a quick dice.  Add half the onion to the pan (reserve the other half for another cooking adventure).  


Next, begin dicing your red bell pepper.  Cut the pepper in half, reserving one half for another day.  Remove the stem and carefully cut away the seeded white part from the inside of the pepper. You should only have red left by the time you're done (do not skip this step; the white flesh can be really bitter. Patooie!).  Holding the pepper down with one hand, make vertical slices that run the length of the pepper (starting from the stem end and going down, as opposed to across the pepper; click to enlarge the picture).  Gather your slices into a bunch and cut across them to dice the pepper.  Add this to the pan with the onion and saute until tender. 


Sorry for the blur.
Once the onion and pepper are mostly tender, add them to the mixing bowl with the chicken.  Open the can of cheddar cheese and add it to the bowl. Add chili powder to taste.  I usually add a lot; at least another tablespoon.  You want enough so that the chili powder is visibly and liberally dispersed throughout the mixture.  Mix everything together thoroughly.  

Mmmm. Cheesy.
Spread a pie crust flat on each of your cookie sheets (a wider sheet definitely helps).  Spread the chicken and cheese mixture evenly over each of the pie crusts leaving about an inch to spare all around the outer edge. Top with a layer of shredded cheese. This recipe calls for cheddar, because that's what you'll see pictured. However, a colby monterrey-jack blend is also very tasty.  You can either shred your own or use pre-shredded.  

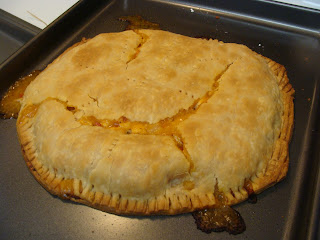
Place another pie crust over the top of the filling.  Seal the edges together by pressing around the outer edge with your fingers.  Try to get as close to the filling as possible with your seal, but don't actually press on the filling part (this will cause an explosion; ask me how I know).  Trim the excess pie crust from around the edge, then seal more firmly by pressing one of your forks along the edge of the crust. Reserve any excess crust for another recipe (waste not! You could turn this into tartlets or turnovers). Using the fork, poke a few holes in the top. Repeat for the other empanada.


Bake at 375F for about 30-40 minutes until the top has turned a nice golden brown.  Serve with a dollop of sour cream and garnish with fresh cilantro.  Yum! (I may or may not have been too busy nomming this to get a good picture of it on the plate all pretty. Heh heh).


Sunday, March 11, 2012

Shrimpy Grits, So Much Better Than Gritty Shrimp

So I figured it was about time for another straight-up Southern recipe.  My mother has been after me to make Shrimp and Grits for a while, so I finally did.  I'd never made this particular dish before, so it gave me an opportunity to experiment, which is always fun. To create this recipe, I took what I knew about the basic ingredients for Shrimp and Grits and adjusted until I had something I was pleased with. I'd like to play with it a bit more, perhaps get some tomato flavor going, but I'm super-pleased with how this turned out. If you don't know what grits are (Bless your heart, you poor deprived thing), check out this Wikipedia page on the topic.

What You'll Need
Supplies
Cutting board                                                             2 qt. pot
Knife for chopping                                                      Small bowl
Cheese grater                                                             Large cast iron skillet
Medium mixing bowl                                                  Large serving bowl
Ingredients
4 cups water                                                              Olive oil
1 cup stone-ground grits                                            3 tsp garlic, minced
3/4 cup white cheddar                                               3 green onions
3/4 cup sharp cheddar                                               1/2 Tbsp parsley
1/2 cup parmesan                                                      1/2 tsp ground cayenne pepper
1/2 stick butter                                                          2 dashes chili powder
1 lb. shrimp                                                                Lemon juice
4 slices bacon

Now Let's Make Shrimp and Grits!
Lovely Assistant Jen
To begin, measure out 4 cups of water into your 2 qt pot and set it on the stove over high heat so that you can bring the water to boil.  While the you're waiting on your water, measure out 1 cup of grits (for you non-Southerners that's grits plural, please don't ever call them grit) and set them aside. Now, begin shredding the two cheddar cheeses. You want to shred enough to have 3/4 cup of each, which is about 2.5 -3 oz (if you have a lovely assistant, now is a great time to put her to use). Chop your green onions, discarding the white parts, and mince your garlic (or use jarred minced garlic like me). If you're using fresh parsley, chop that, too.  Set aside.

Once the water comes to a boil, add the dry grits.  Reduce to a low heat and cover. You'll want to stir occasionally to ensure that your grits don't get lumpy or start to stick. While you're waiting, combine the sharp cheddar, white cheddar, and parmesan in your medium bowl.  You don't have to mix it, but you want it all together before you add it to the grits later. Cut the 1/2 stick of butter into pieces over the bowl of cheeses. Set aside. (Sorry if the photos are a bit off tonight guys, my camera batteries were both dead, so I had to steal Lovely Assistant Jen's iphone).

Cameo! That's my Mom.
Stir your grits (Stir, I say! *cracks whip*).  Take your shrimp and the small bowl to the sink.  Begin removing the tails from your shrimp, placing the shrimp in the bowl and the discarding the tails.  Try to remove as much meat from the tails as you can. If you're not careful, the shrimp will rip and you'll leave behind a small portion in the tail. I find a couple wiggles at the the base of the shrimp before you pull it out helps this process along.  For this recipe I used precooked shrimp (because it's quicker and was on sale; mostly because it was on sale). It's fine, however, to use uncooked shrimp (they'll likely better absorb flavor, anyway), just know that you'll need to cook them a bit longer later in this recipe.

Stir your grits.  Now, lay out 4 slices of bacon in your large cast iron skillet and fry the bacon over medium heat until crispy (you'll know it's done when you find it really hard to resist eating it). Remove the bacon to some paper towels, and pat to remove grease. Try to get as much grease off the bacon as possible. Set aside.

Check your grits; they'll be done as soon as all the water is absorbed. If they're not done, stir and keep cooking. You'll have to wait until they're done to move farther in this recipe, since the shrimp cooks quickly. Hopefully, though, the grits have had plenty of time to cook. Pour the grits into your large serving dish.  Add the bowl of cheeses and mix thoroughly until all the cheese has melted. Make sure to blend everything together well; you don't want any pockets of cheese or of plain grits. Place the serving dish in the oven on warm until the shrimp are done. This will help the grits set, while also keeping them from cooling (cold grits are foul, by the way).

Take your large skillet and drain off any excess grease from the bacon.  Add a dab of olive oil and heat the skillet to medium high heat.  Add 3 tsp garlic, 1/2 Tbsp parsley, 1/2 tsp cayenne pepper, a couple dashes of chili powder, and the green onions. Cook until the garlic begins to brown (This will help release flavor). Add the shrimp and saute until the spices are evenly distributed and the shrimp have heated. Do NOT overcook (no one likes rubbery shrimp). If you're using uncooked shrimp, cook the shrimp until they turn pink and begin to curl, about 3 minutes.

Spoon the shrimp on top of the center of the grits. Make sure to get all the seasonings, too; pour the contents of the skillet over the top of the shrimp if necessary.  Squirt the shrimp with a little bit of lemon juice to taste. Garnish by crumbling the strips of bacon over the grits and around the shrimp in the center. Serve.


   Pin It