Sunday, April 29, 2012

Tastes Like Chicken!

Because it is.  (Bwahahahahaaa! I'm hi-larious) Tonight's recipe features something super easy and fast.  Why? Because a) I'm still sick (*hack, cough, hack*) and b) I just got off work.  You have those sort of days, too, right? RIGHT?! Ah, I thought so. Without further ado, I give you Work-Night Chicken Quesadillas.

What You'll Need
Supplies
Cutting board                                                                 Large skillet
2 forks                                                                           Cast iron griddle
Knife
Ingredients
1 rotisserie chicken                                                        1 tsp minced garlic
Tortillas                                                                          Chili powder
Shredded cheese                                                             Cilantro
1 Tbsp olive oil

Now Let's Make Work-Night Chicken Quesadillas!
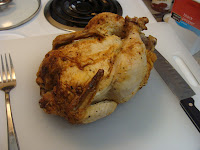
Put your rotisserie chicken on your cutting board. Slice slightly to one side of the center of the chicken to begin removing the breast.  Don't worry if you're not a master carver; it doesn't need to be pretty.  Take your chicken breast, and remove any of the skin still attached (no one wants to get a big hunk of rubbery skin in their quesadilla. Trust me, learn from me). Now, use one of your forks to hold the piece of chicken down.  Take your other fork and firmly drag it across the piece of chicken to begin shredding the chicken. Continue until the entire breast is shredded.  Repeat for the other chicken breast and any other meat you can/want to pull off the chicken.

 Remember, click to enlarge for a closer view!

Set your cast iron griddle on an eye and heat it to medium heat (about four or five). Now ignore it and move over to your skillet.

In your skillet, heat about 1 Tbsp olive oil over medium heat. Add your newly shredded chicken and 1 tsp of minced garlic.  Add chili powder to taste. Personally, I like a lot.  If you have time and are so inclined, you could also add half a diced bell pepper. Saute the meat until it is heated throughout and flavors have mingled.  Reduce heat to low.

Come back to your griddle.  By now, it should have reached an even heat.  Place a tortilla on the griddle.  Sprinkle with shredded cheese as desired and add a few cilantro leaves as well. Watch as the cheese slowly melts. Once all the cheese is melted, add chicken to the center of the tortilla. Make sure to divvy up the chicken based on however many quesadillas you're prepping.


Okay, so I used a spatula.
Using one of your forks, fold one side of the tortilla over the chicken in the center. Then, fold the other side over. Remove to plate. Add another tortilla and repeat until all your chicken is used up. Serve with a salsa and sour cream. Some other ingredients you can add right before wrapping the tortilla up? Freshly diced tomatoes, sliced red onion, chopped lettuce, olives, etc.  Enjoy!


Thursday, April 26, 2012

Curious Cats and Whiskery Puns

I've been on a cozy mystery kick lately; maybe it's the onset of spring, but I've been craving tales of country life and the outdoors.  Accordingly, I've picked up where I left off in the Mrs. Murphy Series by Rita Mae Brown. I've posted a general series post, The Cat's Meow, on these books before, where I covered the overall feel of the series.  But, I think it's time to dig deeper to give you more of an idea of why you should pick this series up, so let's start with book 12.

The Basics
Brown, Rita Mae and Sneaky Pie Brown. Whisker of Evil. New York: Bantam Books, 2005. Print.

In reviewing my previous blog post, I've realized that I never did a bio for the author - a gross oversight.  So, Rita Mae Brown. Ms. Brown has a rich history as a political activist in various rights movements. She's an active participant in American fox hunting, and her passion for fox-hunting and horses hovers ever present in much of her fiction. Lastly, she co-authors the Mrs. Murphy series with her cat Sneaky Pie, and that's probably the most awesome fact at all (or so Sebastian R. Gato informs me).

To date, there have been 20 Mrs. Murphy books and one cookbook (which I really should get my paws on). Set in the rural Southern town of Crozet, Virginia, the series follows Mary Minor "Harry" Harristeen as she sticks her nose into every mystery that comes her way. And, there's a whole lot of murder going around in Crozet (perhaps they should check the water).  Fortunately, Harry has her animal companions to bail her out with their superior senses and mystery solving skillz:  Mrs. Murphy, a tiger cat; Pewter, a somewhat chubby gray kitty; and Tucker, her loyal and dauntless Pembroke Corgi.

The Book
Let's start with the title: Whisker of Evil.  I mean, what's not to love about that title! Doesn't it just conjure the image of a cat twirling its whiskers like a villain twirls his mustache? Which brings me to the best characters in the series, the animals.  Much of this story (and the others) is told in a third person point of view that follows not the human characters, but the animals who are in the human's presence.  This makes for a really fun, interesting, and different perspective.  And, as usual, Mrs. Murphy, Tucker and Pewter are whip smart and on the job.

So far, this has been my favorite book in the series to date.  In part, this is the result of the atmosphere Brown creates for her chosen setting.  I've complimented this series before on the vividness of the countryside in which the books are set, but this book exceeds all expectations.  You don't simply get a feel for the South or Virginia in this book. The book is so steeped in themes of country life, farming, horses, Southern charm and hospitality that I feel like I could reach out and run my hands over the slightly rough wooden exterior of Harry's barn.  I don't just feel like there's a well-described vivid world for me to view; I feel like I've been plopped down in this corner of Virginia and let loose to explore. It's that well done.

The other reason this is one of my favorite books so far is the quality of the mystery. This one took me and extra long time to solve. I still got there ahead of Harry (my typical goal when reading mysteries), but this one was a little harder to piece together.  I found my suspect about halfway through, but wasn't at all sure of the whys and hows, the mechanics of the mystery, until very close to the conclusion.  I'm never convinced that I've pinpointed the correct culprit until I understand those elements.  This book really drew me in by keeping me guessing.

Extras


Sunday, April 22, 2012

Green Foods Need Love, Too

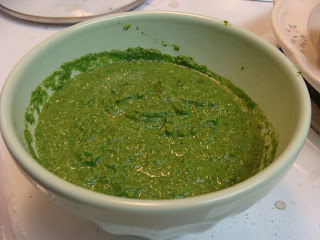
So, it's Earth Day.  In celebration, I thought I'd do a recipe that I've been talking about for a while but haven't gotten around to yet: Mint Chutney also known as Green Chutney.  This is a popular condiment in Indian cooking, and I, personally, could eat it on just about everything. It's especially good with Naan and a nice curry.  Don't let its green and runny appearance fool you (apparently some people find that off-putting), this little sauce is delicious, subtle, and can pack a sneaky punch.  I make no pretensions to authenticity. This recipe is the result of my experiments with a very basic recipe, tweaking until I got the flavors where I wanted them.

What You'll Need
Supplies
Cutting board                                                     Food processor or blender
Knife for chopping                                             Spoon
Measuring spoons                                              Small serving bowl
Ingredients
3 small green chilies                                          1 bunch cilantro
1 tomato                                                             1 bunch mint
3 Tbsp water                                                     1 7oz package grated sweetened coconut
3 Tbsp lemon juice                                             3 spoonfuls plain yogurt
3/4 tsp salt

Now Let's Make Mint Chutney!
Before we get started, let's have a few words (okay more than a few) about ingredients. For the chilies, I like to use the small green ones that you can find in bags at a good Asian grocer (these are about a finger length). If you can't find those, go with serrano peppers (pictured, since I couldn't find the others this go round). For the tomato, try to get a juicy variety; one of the big round ones should do.  

Take your three chilies, and begin chopping them. Slit the chili length wise, starting just shy of the top (stem side) and going all the way through the tip. Turn the chili to the unsliced side and repeat.  Essentially you've quartered your pepper, but left the quarters attached to the pepper by not cutting through the top.  Now, starting at the tip and moving toward the top, begin chopping your pepper. Repeat for the other two peppers. Set to the side, and coarsely chop your tomato. Add the peppers, tomato, 3 Tbsp water, 3 Tbsp lemon juice and 3/4 tsp salt to the blender or food processor (I got a food processor for my b'day, y'all and it's heaven). Blend until nice and liquidy.


Take your bunch of cilantro and rinse it really good (as I've said before, cilantro from the grocery is filthy). Gather the leaves in as tight a bunch as possible and chop the cilantro beginning at the leafy end and moving toward the end that's all stems.  Don't worry about any of the stem getting in the mix during the process; it's all the same flavor and you won't notice once liquified. Discard the stemmy chunk you're left with. Add the chopped cilantro to the blender. 

Now, for your bunch of mint (also rinsed) you can either use two containers of mint found with the other refrigerated herbs (usually near the salads), or you can take it fresh from the garden. Either way, you want enough leaves (leaves only here! Mint stems are woody) to fill your two hands cupped together. Pluck the leaves from the main stem and, when you're sure you have enough, add them to the blender.

Next, take your bag of sweetened coconut, and add about half the bag to the blender. I know sweetened coconut sounds weird and most recipes call for plain, but I find that the sugar is necessary to the overall flavor of the chutney. It adds a balance to things that wouldn't be there otherwise.  Anyway, by now you should have cilantro, mint, and coconut in your food processor waiting to go. Blend! If you're using a blender (as I sadly was still), you may have to stop occasionally and use your spoon to press things down a bit. Blend until liquidy. 

She forgot to take a photo
Content yourselves with me,
hoomans
Add about three big spoons of plain yogurt (I was using a tablespoon; you know the bigger one that's great for soups and cereals) to the blender and blend.  Once the yogurt is throughly mixed in, its time for a taste test.  Take a taste and wait a few seconds for the spicy to catch up to you. Too powerful? Add a big pinch of coconut (that's a pinch using all your fingers, by the way) and a smaller spoon of yogurt. Blend. Repeat until level of spiciness and flavor suits your taste.

Serve in a small serving bowl. Provide everyone with smaller condiment bowls so that they can dish themselves their own private stash of mint chutney.  This chutney can accompany just about any Indian dish you decide to make. Happy Earth Day and remember green food needs love, too, so enjoy!

I'm so much tastier than I look.


Thursday, April 19, 2012

Ready Player One

Because, no title can top the one the book already has. In the interest of reading diversity here on the Book Pantry, I've decided to do something a wee bit different with today's book post. Today, I'll be handing the keyboard over to my boyfriend for the meat of the book review portion.  I read across a pretty large array of genres, but inevitably there are books that, while interesting, simply aren't my cup tea (earl gray, two sugars and cream, please, thank you) or that I simply set aside to pursue books that interest me more at the moment.  Ready Player One is one such book.  I initially picked it up thinking it looked super-interesting, but just never really got around to reading it. While I'm sure I will, I wanted to go ahead with a blog post, because I have an inkling of a suspicion that it's a epically awesome read.

The Basics
Cline, Ernest. Ready Player One. New York: Crown Publishers, 2011. Print.

Ernest Cline was born in 1972 and thus grew up in the 80s (that remarkably obvious statement explains a whole lot about the novel; trust me (P here: don't trust her)). He is an author with many hats: spoken word artist, screenwriter, novelist. And to confirm his status as super-nerd (and thus a hero to us lesser nerd peons), I offer this proof: he owns a 1982 DeLoreon DMC-12 a la Back to the Future.

Set in the year 2044 with the world left in a not-so-nice state, most of the populace has chosen to abandon reality in favor of the OASIS, a massive online video game created by James Halliday.  Halliday becomes the richest person on the planet as a result, but dies without an heir.  Instead, he leaves a quest behind for players of the game, hiding three keys that unlock three challenges that will ultimately lead them to find Halliday's Egg (as in Easter Egg).  Whoever possesses the Egg becomes the heir to his fortune and the controlling interest in OASIS. Wade Watts, aka Parzival, finds the first key and the real adventure begins.

The Book
So, without further ado, I hand the blog over to my boyfriend:

There's a lot to love in this book, but for me I think that the greatest feature was all the references to 80s pop culture, and gaming in particular.  The OASIS is massive,  with hundreds of planets and star systems based on both real and fictional locations that the three keys could be hidden in. In order to have a prayer of ever finding them, Egg hunters (known as Gunters) have taken to studying all of Halliday's obsessions in the hopes of finding likely hiding places. Since Halliday grew up in the 1980s, 80s music, movies, TV, and video games have experienced a resurgence in popularity due to Halliday's love of the decade.  This leads to loads of glorious fan service, and every page of the book is chock full of love for the decade.  References to Ghostbusters, Back to the Future, War Games, Monty Python and the Holy Grail, Blade Runner, and even School House Rock show the love that Ernest Cline has for the decade and offers up a nice bit of nostalgia.

The book's virtual reality setting allows the characters to experience situations that they could never find themselves in in real life.  The fictional world has both fantasy and sci-fi elements, so in one chapter Wade may be fighting off space bandits in his spaceship, when earlier he was exploring an ancient tomb inhabited by a lich.  This also allows for some truly outrageous (and awesome) action scenes, from gun battles in anti-gravity dance clubs to giant robots fighting rubber monsters. Even the scenes that involve nothing more than playing classic video games such as Pac Man or Joust are so well written that these seemingly mundane activities are made tense and exciting.  The fact that the characters are not in real physical danger (most of the time) never diminishes the excitement of what's happening.  I found myself getting pulled into the story, trying to figure out the clues along with characters, which made things even more fun.

This is probably one of my favorite books in recent memory and for good reason.  It was as if someone reached into my brain, pulled out all the things I love, and made a book out of it. The action is good, the dialogue between characters feels genuine, and the world-building of both the real and virtual future is extremely interesting. This book is definitely not for everyone.  The large amount of 80s and video game references could serve to limit some people's enjoyment of the story. However, if you have ever thought of yourself as gamer, nerd, or geek, then this book is definitely required reading material. And really, everyone else would probably get a kick out of it, too.

Extras
Hi there, I hope you enjoyed my guest author (*glares meaningfully*), I'm back to share some the neat-o-keen book related goodies scattered around the interwebs.
  • Ernest Cline has a really cool (80s gaming themed, of course) personal website.  Especially check out his hilarious bio while you're over there.
  • Like any tech-savvy author, Cline has a blog.
  • Cline created a soundtrack based on the music mentioned in the book, which can be found here on Spotify and features some delightful 80s music (who doesn't love 80s music, amiright?).
  • And don't miss out on the official Ready Player One website.
  • Check out all the spiffy covers released with this book internationally.


Sunday, April 15, 2012

Wholesome and Hearty

For today's culinary offering, I have Vegetable Beef Soup.  This recipe comes from my Aunt Caitilin and her family out in California, so you have them to thank (or curse when you scald you mouth on hot soup cause it smells too tasty to wait).  The great thing about this recipe is that it's pretty easy, and you can throw in the vegetables that you have on hand (fresh or frozen, no need to be picky). The prep work takes a little time, but once the soup is going, you can pretty much ignore it.

What You'll Need
Supplies
Knife for chopping                                                        Measuring cup
Cutting board                                                                Measuring spoons
Potato peeler                                                                 Soup pot or Cast iron dutch oven
Ingredients
1 Tbsp olive oil                                                             1 cup water
1 1/2 pounds stew meat                                              1 (14 1/2 oz) can diced tomatoes
1 yellow onion                                                              1 tsp chili powder
2 tsps minced garlic                                                     1 tsp soy sauce
2 stalks celery                                                              1 tsp Worcestershire sauce
2-3 carrots                                                                   1/2 tsp thyme
1/2 red bell pepper                                                       2 bay leaves
2 russet potatoes                                                          1 1/4 tsp salt
1 cup frozen cut green beans                                       Black pepper to taste
3 cups beef stock                                                          1 cup frozen corn
3 cups tomato juice                                                      1 cup frozen peas

Now Let's Make Vegetable Beef Soup
Meat and onions!
Let's start with some of that prep work I mentioned.  Begin by dicing your onions. Start by removing the non-root end. Slice through the onion in vertical lines, stopping just short of the root and working your way around the onion. Turn the onion so that the root faces parallel and away from your knife and begin chopping for a quick dice. Once diced, put 1 Tbsp olive oil in your soup pot and warm over medium heat. Add the onions and the stew meat and let them begin to saute. Stir occasionally, but move on to the rest of your prep work.

Take your two stalks of celery (give 'em a good wash, grocery store celery is filthy) and begin chopping.  Once chopped, gather the celery into a pile and dice by rocking your knife across the pile.  Repeat these steps until you've achieved a fine mince (I hate celery, so it has to be very tiny for me).  Next, cut your red bell pepper in half and remove the stem and the white, seeded flesh inside.  Set one half aside for another day. Hold your half pepper down with one hand and slice vertically along the pepper in thin lines. Gather these together, turn and chop across them until the entire half pepper is diced. Add the celery and red pepper to your sauteing meat and onions. Don't forget to stir occasionally!


Do NOT peel yourself, trust me.
Next, take your potatoes and carrots and peel them (best do this over a sink or trash bag).  Hold the vegetable in one hand and apply the peeler in swift strokes moving away from your body.  Rinse the vegetables once peeled in order to remove any dirt that got on the flesh during the peeling process. Beginning at the tip, slice the carrot into thin rounds. Discard the carrot top.  If you're working with large carrots, you'll only need two and you may need to halve the larger rounds that were cut closer to the top of the carrot. If you're working with smaller carrots, you may need three.  Next, coarsely chop the potatoes into chunks.  The easiest way to do this is to quarter the potato, and then chop those pieces up.


Add the potatoes and carrots to the soup pot, along with 2 tsps of minced garlic.  Now, measure out and add 3 cups of beef stock, 3 cups of tomato juice, and 1 cup of water. Stir everything together well.


Open the can of tomatoes, and add them to the pot, juice and all (do NOT drain).  Add 1 cup of frozen cut green beans.  Next, measure out and add 1 tsp chili powder, 1 tsp soy sauce, 1 running over tsp Worcestershire sauce, 1/2 tsp dried thyme, 2 bay leaves, 1 1/4 tsp of salt, and as much ground pepper as you'd like to the soup.  Stir well.  Reduce the heat to medium low, cover, and let simmer for about an hour (or more, it'll only add flavor), stirring occasionally.  

I swear there's corn in there somewhere
About 15 minutes before you're ready to serve (or after an hour), measure out and add 1 cup of frozen whole corn kernels and 1 cup of frozen peas.  At this point, your meat should be nice and tender. If it's not, you might want to hold off on this step for a bit. Also, feel free to use fresh veggies if you have them on hand; since it's not quite summer yet, I didn't.  Stir well, and allow to cook uncovered for an additional 15 minutes.

Remove the bay leaves if you're picky and serve along with a delicious slice of Irish Soda Bread.  The perfect pairing.  Enjoy with friends and family (see I do feed my Lovely Assistant Jen)!


Friday, April 13, 2012

Fantastic Fantasies: By The Sword

It occurred to me the other day when I was contemplating what book to post on next that I hadn't done, well, anything on a nice, classic high fantasy novel (we're talking Lord of the Rings, epic sword-swinging, magic-wielding stuff here).  These days I tend more toward the supernatural / urban fantasy side of the genre. But, that is a serious gap I mean to address, especially since high fantasy was a big part of my early reading life. One of the first adult level books I ever picked up was By the Sword by Mercedes Lackey.  I was hooked, and her Valdemar series became one of my most treasured escapes.

The Basics
Lackey, Mercedes. By the Sword. New York: DAW Books, 1991. Print.

Mercedes Lackey is a prolific author in the fantasy genre; seriously I'm not even going to try to delve into her oeuvre here (It's big; the end). She's also worked with some big names in the fantasy fiction world, like Piers Anthony, Marion Zimmer Bradley, Andre Norton, and Rosemary Edgehill to name a few.  She's active in bird rehabilitation, which is pretty cool, and she often writes lyrics and folk music that tie in with the fantasy world she creates.

The Valdemar series is by far her most heavily populated, spanning 30 novels, 7 short story collections, and a companion book. By the Sword was my introduction to this world and remains my favorite (not that that stopped me from dedicating a ton of shelf space to this series).  The book follows the life of Kerowyn as she journeys from daughter of a Keep lord, to apprentice sword-slinger, to mercenary and leader. Having rescued her brother's kidnapped bride, Kero becomes apprenticed (more or less) to the sword mistress, Tarma.  This sets her on the path to become a mercenary with the Skybolts, where she works her way up the ranks and eventually makes her way to Valdemar (home of talking horses, what's not to love!).

The Book
Now that I'm done boring you with my atrocious summary (it's so hard to summarize fantasies without them sounding really bad), let me tell you why you need to pick up this novel (and then the whole darn series). Let's start with Lackey's fantastic world-building skills.  Lackey has created a world that spans a continent rather than a country.  While many of the novels are set in Valdemar, others, like By the Sword pick up elsewhere. Her world is so well crafted that you can pick up a character in any given location and have it connect with the world of the other novels. She's also built an entire history to the world, so that the series spans time as well as geography. Each new novel adds a new layer of richness.  The result? A seamless fluidity that makes the world of Valdemar and Velgarth seem like a tangible reality, and the stories become that much more immersive.

To get more specific about By the Sword, we become immersed in vaguely medieval world, with sorceresses, keeps, nobility, and an enormous, intelligent, mind-speaking wolf (known as Warrl; he's a favorite). I especially like all the details that focus on sword-play, stealth, strategy and war that appear as we follow Kero in her career as mercenary. Plenty of fantasy novels have mercenaries, mention mercenaries or talk about mercenaries, but few focus so exclusively on them to the degree and depth that Lackey does in By the Sword. We get an up-close look at mercenaries in Lackey's world that includes their organization and operations. It makes for an interesting and different slice of the fantasy world.

But the best part of this particular book is Kero.  Lackey's novels tend to be very character driven, giving readers very well developed characters to get to know (and love).  In particular, Kero was my Katniss (minus the grumpy dystopia).  Kero is a strong, independent female character; she takes care of herself and others, is a great leader, and can totally kick ass if necessary. As a thirteen-year-old she was my hero, and I'm awfully fond of her still today. We watch her grow up from a teen who's not quite sure where she fits yet, to fierce warrior, to a superb leader that puts duty and her people first. Add a little adventure into the mix, and you'll love every second of it.

I highly recommend this novel and the series to fantasy lovers of all ages.  There's a little something for all tastes in Lackey's Valdemar books.

Extras


Sunday, April 8, 2012

It's an Easter Fiesta!

Cause, you know, what says Easter Sunday dinner like Chicken Empanada? Am I right? (What's that? I'm not?).  Okay, okay, I'm joking. This is actually a great recipe for the day or two after you've prepared a big feast, when what you really need is a break from the kitchen (Easter, Passover, Spring Equinox, whatevs).  This particular Chicken Empanada recipe is super easy and quick. Oh, and it's delicious, just saying.

What You'll Need
Supplies
Cast iron skillet                                                              Pan for sauteing
2 Forks                                                                           Large mixing bowl
Cutting board                                                                 Mixing spoon
Knife for chopping                                                          2 cookie sheets
Ingredients
3 chicken breasts                                                           1/2 red bell pepper
Olive oil                                                                           1 can Campbell's cheddar cheese
Chili powder                                                                    Shredded cheddar cheese
Garlic powder                                                                  2 boxes pie crusts
1/2 yellow onion                                                             

Now Let's Make Chicken Empanada!
Start by cooking your chicken. Drizzle some olive oil into your cast iron skillet.  Roll your chicken breasts through the olive oil to coat all sides, then arrange them flat side down in the skillet.  Lightly sprinkle the chicken with garlic powder, then liberally sprinkle them with chili powder. Bake at 375F until the chicken is cooked and white throughout (there should be absolutely no pink, unless you want to spend a couple days worshipping the porcelain gods).  I like to do this step with whatever I'm cooking the night before, so that the chicken is ready to go the next day. If you have any left over (ie from a roast), feel free to skip this step and use that instead, just know that you need about a 14 - 16 oz of meat.


Insert witty caption here.
If your oven isn't still set to 375F, begin preheating it now. Using your two forks, begin shredding the chicken.  Use one fork to hold the chicken breast in place.  Firmly drag the other fork across the chicken breast, using it as a claw to pull the chicken apart.  Try not to shred the chicken too finely; you want bite size pieces of chicken. Repeat this process until all your chicken is shredded. If you're working with leftovers of a whole chicken the process is similar, although you may be pulling pieces of the appropriate size directly from the chicken. Place the shredded chicken in your large mixing bowl.

Take out the pan you plan to use for sauteing and warm a small amount of olive oil in it over medium heat. While the oil warms, dice your onion.  Cut off the non-root end, then moving around the onion make even cuts that stop just shy of the root.  Then, root-end facing away from your knife, begin chopping the onion for a quick dice.  Add half the onion to the pan (reserve the other half for another cooking adventure).  


Next, begin dicing your red bell pepper.  Cut the pepper in half, reserving one half for another day.  Remove the stem and carefully cut away the seeded white part from the inside of the pepper. You should only have red left by the time you're done (do not skip this step; the white flesh can be really bitter. Patooie!).  Holding the pepper down with one hand, make vertical slices that run the length of the pepper (starting from the stem end and going down, as opposed to across the pepper; click to enlarge the picture).  Gather your slices into a bunch and cut across them to dice the pepper.  Add this to the pan with the onion and saute until tender. 


Sorry for the blur.
Once the onion and pepper are mostly tender, add them to the mixing bowl with the chicken.  Open the can of cheddar cheese and add it to the bowl. Add chili powder to taste.  I usually add a lot; at least another tablespoon.  You want enough so that the chili powder is visibly and liberally dispersed throughout the mixture.  Mix everything together thoroughly.  

Mmmm. Cheesy.
Spread a pie crust flat on each of your cookie sheets (a wider sheet definitely helps).  Spread the chicken and cheese mixture evenly over each of the pie crusts leaving about an inch to spare all around the outer edge. Top with a layer of shredded cheese. This recipe calls for cheddar, because that's what you'll see pictured. However, a colby monterrey-jack blend is also very tasty.  You can either shred your own or use pre-shredded.  

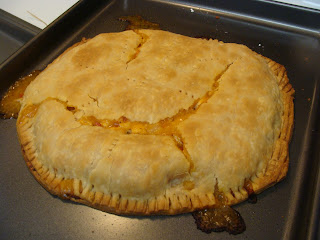
Place another pie crust over the top of the filling.  Seal the edges together by pressing around the outer edge with your fingers.  Try to get as close to the filling as possible with your seal, but don't actually press on the filling part (this will cause an explosion; ask me how I know).  Trim the excess pie crust from around the edge, then seal more firmly by pressing one of your forks along the edge of the crust. Reserve any excess crust for another recipe (waste not! You could turn this into tartlets or turnovers). Using the fork, poke a few holes in the top. Repeat for the other empanada.


Bake at 375F for about 30-40 minutes until the top has turned a nice golden brown.  Serve with a dollop of sour cream and garnish with fresh cilantro.  Yum! (I may or may not have been too busy nomming this to get a good picture of it on the plate all pretty. Heh heh).


Friday, April 6, 2012

On a (Sneeze) Break

Due to an extremely high pollen count and recurring sinus headaches, The Book Pantry is taking a 1 post break this week.  Your regularly delicious programming will resume on Sunday with a nom-worthy Chicken Empanada recipe.  Stay tuned.

Perhaps you'll accept this adorable photo of Sebastian R. Gato instead?

If you know what's good for you hooman,
you'll accept.

Sunday, April 1, 2012

Attack of the Flying Spaghetti Monster!

Mmmmmm, tasty spaghetti monster. Spaghetti, or more particularly, spaghetti sauce is a long standing favorite in my family.  Believe it or not, there was a time when I refused to eat it (thankfully I grew out of picky eating and here I am today).  My mother makes some of the tastiest sauce you can find, and naturally she taught me. The real trick to great spaghetti sauce is getting your balance of herbs right; something Mom is really good at, having worked in the nursery (that's plants obviously, cause you can't cook small children) business ever since I can remember. Don't have great herb-sense? Don't worry I kindly reduced my usual haphazard slinging of stuff into the pot into measured amounts below (you're welcome *smiles sweetly*).

What You'll Need
Supplies
Cutting board                                                                   Large stock pot
Knife for chopping                                                            Long-handled mixing spoon
Small knife or kitchen scissors                                        Can opener
Ingredients
1 large white onion                                                           Marjoram 
1 lb lean hamburger meat                                                Oregano
1 pkg hot italian sausage                                                 Rosemary
3 large (29 oz) cans tomato sauce                                       Thyme
2 large (28 oz) cans diced tomatoes                                     Basil
1 (12 oz) can tomato paste                                                   Bay leaves
Olive oil or butter                                                               Salt and pepper

Now Let's Make Spaghetti Sauce!
To begin, you need to peel and dice your onion. Cut the non-root end off your onion. Peel back the outer layers of skin and discard. Moving around the onion, slice through the onion in straight, evenly spaced lines, stopping just short of the root. (Incidentally, I'm pretty sure this is how Bloomin' Onions are born).  Now, with the end that you cut off facing your knife, begin chopping your way through the onion, moving towards the root. And, voila! Diced onion.


Fun fact: I cry so hard when I cut
onions that I'm a danger to myself
and others.
In your large stock pot, add a small amount of olive oil or butter. Turn the stove eye to medium heat, and warm the oil. Once the oil has warmed (not sizzling, you don't want to burn it), add the diced onions. Saute the onions over medium heat, using the long-handled spoon to move them about occasionally.  Be careful not to let the onions burn; if they start browning in spots, you're not moving them around enough. Saute until the onions are translucent and tender.

Now it's time to add the meats. This is when I find it's easier to press a kitchen assistant into service, since they can stir the cooking hamburger meat while you deal with the sausage. However, if you do not have an assistant handy, simply remove the pot from the stove eye for this part. Open your hamburger meat and add it to the stock pot, using your spoon to break it up a bit. Use the leanest ground beef you can find (ground turkey works, too, if you swing that way), since excess grease will affect the consistency of your sauce.  Next, remove the casing from your hot italian sausage. Using your hands, break of smallish pieces from the sausage and add them to the pot. Continue until all the sausage is used. (Can't find hot italian sausage? Add 1 Tbsp red pepper flakes to compensate). Saute until the meat is no longer pink, stirring as needed.

I could live off tomato products.
Once your meat is ready, you can begin adding the tomato products (flex your wrists; this is a lot of can-opening). Open all your cans. Add all three cans of tomato sauce to the stock pot.  Drain the juice from your diced tomatoes, then add both cans to the stock pot. Lastly, add your entire can of tomato paste, scraping the sides of the can to access all the gooey, tomatoey deliciousness (Also, try not to burn tonight's dinner while editing your blog post!).  Stir the tomato products into the meat and onions well, making sure to get a fairly even mix.  Turn the heat up to just under high (about 8 or 9).  You want to bring the sauce to a light boil before moving on to the next step.  Stir regularly, making sure to lift sauce up from the bottom to avoid scorching.  Once the sauce has started to bubble plenty, reduce the heat to a medium-low setting (about 3). This should be enough to maintain a slow simmer.

Not pictured: bay leaves.
Cause I'm lame
Now it's time to add the herbs!  So, remember when I said I'd give you measure amounts? What I meant to say was somewhat measured amounts (yes, yes, I'm mean).  Turn your hand palm face up and cup it. This is now your measuring utensil! To give you a little perspective before we do this, the spoon handle in the picture is about 1" wide (click to enlarge!). To the stock pot, add one handful Marjoram and one handful Oregano.  Add half a handful of Rosemary and half a handful of Basil.  Add about half as much Thyme as you did Rosemary. Toss in two or three bay leaves. Deep breath, you're done. (Please note that these amounts pertain to dried herbs. If you're using fresh, you'll need a whole lot more.  Drying herbs increases their potency).

Nom vigorously! Napkins advised.
Stir the herbs into the sauce, making sure to mix them in thoroughly.  Allow the sauce to simmer, stirring occasionally, while you prepare the noodles. Check the box of noodles for the proper water to noodle ratio. Bring the water to boil. Add noodles. Cook until tender. Drain immediately. Serve covered in Spaghetti Sauce and preferably topped with parmesan cheese. Spaghetti sauce keeps for about 2-3 months in the freezer before taste is effected.

Also, super big thanks to all my readers. My views doubled in the month of March compared to February. *Happy dance*