Sunday, January 1, 2012

A Red Velvet Holiday

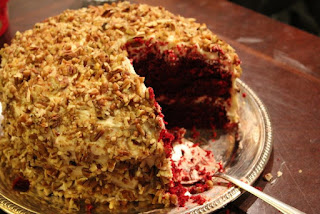
Happy New Year from The Book Pantry! This Christmas dinner, I served a Red Velvet Cake for dessert.  Red Velvet Cake is a southern tradition, although it seems pretty popular elsewhere, too. (And, really, what's not to like?). Mine is loosely based off a recipe for the cake in The Boozy Baker cookbook, to which I've made a few alterations of my own (mainly the type of alcohol and the amount of food coloring). The cream cheese icing recipe is my own, but there's only so many ways to make cream cheese icing, just saying.  This is a delicious and pretty cake sure to impress anyone you happen to serve it to.  Despite my usual low-tech approach to baking (enforced only because I lack toys), this recipe needs a mixer. You cannot mix the cake batter by hand and not over mix, thereby creating a tough cake.

What You'll Need
Supplies
2 nine inch cake pans                                          Measuring cups
Large mixing bowl                                              Measuring spoons
Medium mixing bowl                                           Mixing spoon
Small mixing bowl                                               Long serrated bread knife
Stand mixer                                                         Icing knife/spatula
Whisk                                                                  Cutting board
Cooking spray                                                      Chopping knife
Ingredients for Cake
3 cups cake flour                                                  1 tsp vanilla extract, running over
5 Tbsp cocoa powder                                           1 tsp white vinegar
1 1/2 tsp baking soda                                          3 oz red food coloring
1/2 tsp salt                                                           1 1/2 sticks unsalted butter, softened
3/4 cup buttermilk                                                2 cups sugar
1/4 cup rum                                                          3 eggs
Ingredients for Frosting
16 oz cream cheese, softened                               2 cups confectioner's sugar
2 sticks butter, softened                                       4 Tbsp vanilla
3 cups pecans

Now Let's Make Red Velvet Cake!
Preheat the oven to 350F.  Time for prep work: Remove your 16 oz of cream cheese and 2 sticks of butter from the refrigerator and set aside to soften until you're ready to do the icing. Also remove your 3 eggs so that they come close to room temperature by the time you need them.  Now, coarsely chop enough pecans to equal 3 cups: that's about 4 handfuls.

Spray your two cake pans with cooking spray.  Pour out a small pile of flour into each pan (click to enlarge photos for an example). Dust the pans with the flour by holding the pan up and tilted and tapping the bottom, rotating the pan as you go to allow a thorough coating.  Once the bottom of the pan is coated, continue this process with the remaining flour around the sides of the pan.  I recommend doing this over the kitchen sink, as it can get a little messy.  Set your coated pans aside.


Cocoa Powder! *shakes fist*
In your medium mixing bowl, measure out 3 cups cake flour, 5 Tbsp cocoa powder, 1 1/2 tsp baking soda, and 1/2 tsp salt.  Whisk the ingredients together until they are evenly distributed and there are no large cocoa powder lumps (cocoa powder is sneaky and devious; be thorough in your eradication). Set the dry ingredients aside. 

In your small mixing bowl, measure out 3/4 cup buttermilk (not that non-fat gunk, either; that defeats the purpose of buttermilk), 1/4 cup of rum, 1 tsp vanilla extract (allowing the vanilla to run over into the bowl slightly as you measure), 1 tsp of white vinegar, and 3 oz of red food coloring. Whisk the ingredients together until you have a (very red) smooth liquid mixture.  For a brighter cake add food more food coloring, but be aware that it affects flavor a little.  If you'd like to avoid food coloring altogether, puree 1-2 cooked beets. Keep in mind that the interaction between the buttermilk and the cocoa should achieve a slight red color as it is (woot! Chemistry!). Set the liquid mixture aside.

No shells in this cake!
Place 1 1/2 sticks of butter in your large mixing bowl.  Soften in the microwave if necessary, being careful not to fully melt the butter.  Using your mixer at a low speed (about 2 on mine), beat the 2 cups of sugar into the butter until fluffy. Then, add the eggs one at a time, beating after each addition. I recommend stopping the mixer for each egg addition, so that you can fish out any stray pieces of eggshell that might make their way into the batter. (Remember, an easy way to remove pesky shells is to wet your finger before trying).

Set your mixer to medium-low speed (about 4 on mine, but don't turn it on yet).  For this step you are going to gradually add the flour mixture and the buttermilk mixture, alternating between the two.  You want to do this is partial amounts; I typically wind up with four additions of each.  Start with the flour mixture and end with the buttermilk mixture to achieve the appropriate consistency for your batter. Be careful not to go too slowly and over mix your batter.  Over worked batter will result in a tough, chewy cake. (Blegh!)


Divide the cake batter between your two cake pans, scraping the bowl to get all the good bits. Lightly shake your pans from side to side to settle the batter evenly into the pans.  Bake at 350F for about 40 minutes.  Test the doneness of the cakes by inserting a toothpick (or fork prongs) into the center of the cake. Cakes are done when toothpick comes out clean.  Set cakes aside to cool.

Yes, it's upside down.
Once cakes are mostly cool, remove one cake from pan and place it on your icing station (work area, display, wherever you're planning to ice the cake).  Take your long serrated knife and evenly slice off the curved top of the cake, so that you'll have a flat bottom layer.  Offer the cake top to any circling family members that happen to be around. (Vultures!) Loosen the other cake in the pan, but leave in pan until cakes are completely cool.

Mmmmm... frosting.
While cakes are cooling the rest of the way. Wash out your large mixing bowl, so that you can begin whipping up the frosting.  Place your 16 oz of cream cheese, 2 sticks of butter, 2 cups of confectioner's sugar and 4 Tbsp of vanilla in the (now clean) bowl.  Stir the ingredients together with your mixing spoon until you have a thoroughly blended, smooth frosting. You can flavor the frosting with anything you'd like, simply replace the vanilla with your choice of flavor (lemon juice, more rum, orange liqueur, etc).

Spread some frosting on top of the already stationed cake.  (Do not do this if cake is not yet cool, or you'll have a melty, blobby cake and who wants that?). Smooth the frosting across the surface of the cake until you have a decent layer of frosting.  Remove the other cake layer from its pan and carefully place it centered over the bottom layer.  You can cut the top off this one, too, if you want a flat topped cake, but I never bother. Gently spread frosting over the entire cake, beginning with the top before moving on to the sides.  Try to avoid any bare or translucent spots where the cake shows through.  Once all the frosting is on the cake, smooth it out to make it purty.

Yum!
Now, take your chopped pecans and begin coating your cake.  Start with the top center and work your way outward.  You want some white to show through but don't want any bald spots, so try to be even handed.  "How do you coat the sides?" you ask. I grab a small handful of chopped pecans, get close to the cake and toss/press the nuts into the cake.  This is really messy, so have a broom handy (or a pecan loving dog, either will do).  

Isn't it pretty?!
Now, stand back and admire your handy work!  This cake goes really well with postprandial coffee.

Big thanks to my future step-brother, Stevie, for letting me use his Nikon and helping with the pictures. I'm actually in one! Le gasp.  Also, thank you to my lovely friend Jen for doing the second stage icing, thus preventing me from my annual apoplectic frosting rage.  


    Pin It

2 comments:

  1. Whoo-hoo! That's my hand frosting that cake!

    As always, my pleasure helping with that stage, and I'm fairly certain all of us are happy you didn't have to go into an apoplectic frosting rage.

    ReplyDelete
  2. Clearly you are a most wise woman, Jen.

    ReplyDelete

You know you want to . . .